Questions?
Contact us at support line.
US: 877-270-3475
or
Log in to back office to chat with a representative
Contact us at support line.
US: 877-270-3475
or
Log in to back office to chat with a representative
Visit NCR.com/Silver
Browse by categories
Tags
Tags are a way to group items for things such as promotions. Tags can include departments, categories, items, and items with variations, which are referred to as objects in this guide. When you configure a promotion, NCR Pro Restaurant uses tags to identify the items required for a promotion to apply.
Before you configure a promotion, you must first create a tag. Tag creation and editing occurs in Back Office and requires the access level ‘Tags.’ You can create a tag at the TAGS page or when creating a promotion. You can assign a department, category, item, or item with variation to a tag at the specific object page. For multi-site locations, you can only create and edit tags at the company–level. Tags are read-only at the store level.
Other important information regarding tags:
• You can have multiple tags.
• A department, category, item, or item with variation can belong to different tags.
• When you assign a department or a category to a tag, all items belonging to the department or category belong to the tag.
• You cannot create tags from the POS.
• The Item Import function does not support tag assignment.
• The Edit Multiple Items function does not support tag assignment.
• If a promotion uses a tag, you cannot delete the tag.
CONFIGURING TAGS
To create a tag and assign objects to the Tag:
1. In Back Office, select MENU > TAGS.
2. Click Add a Tag.
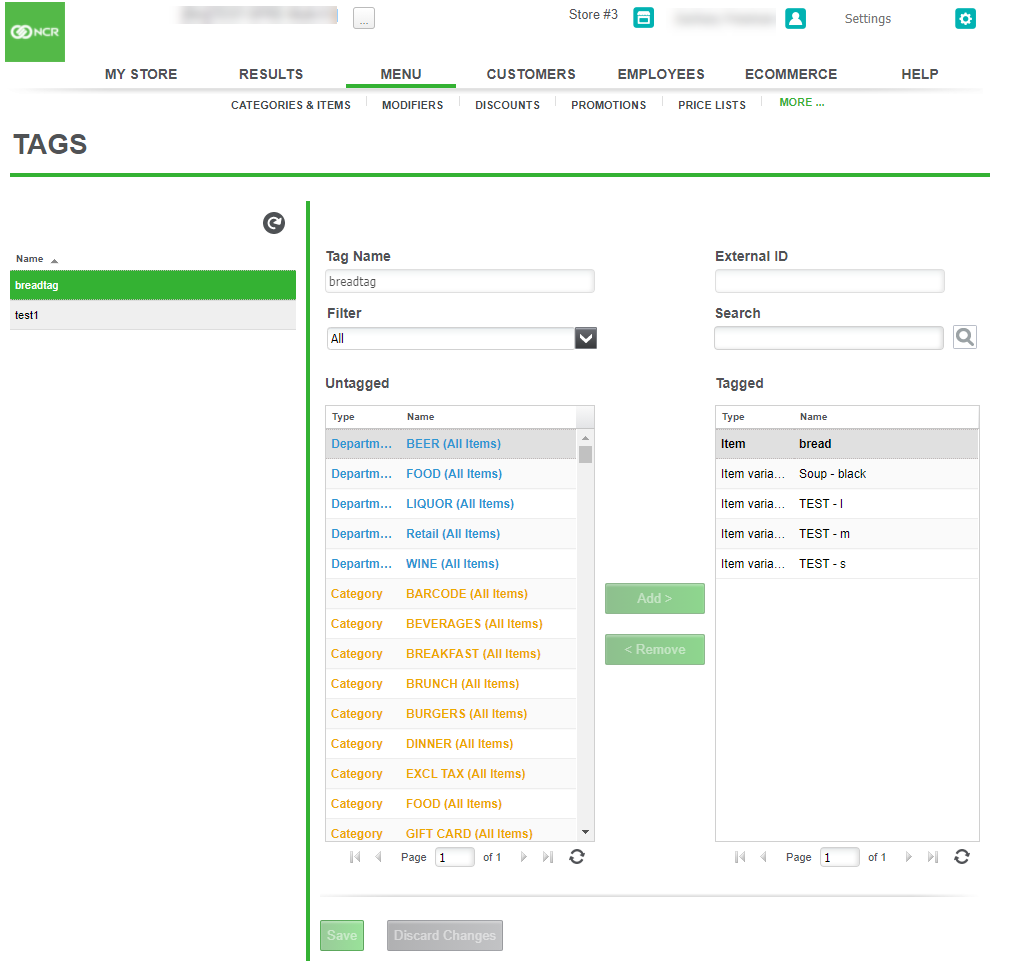
3. Type a name for the tag.
4. Type an external ID number (optional. Used in 3rd part solutions).
5. Select a method by which to filter the items available to tag from the drop-down box. The options are ‘All,’ ‘Departments,’ ‘Categories,’ ‘Items,’ and ‘Item variations.’ The system defaults to ‘All.’ The objects available to tag appear under ‘Matching untagged objects.’
OR
Type the name of the object to search and click to initiate a search. The search results appear under ‘Matching
untagged objects.’ You can type the entire name of the object or a string of characters. For example, if you type ‘be,’ the search results include all objects containing the character string ‘be.’
5. Under ‘Matching untagged objects,’ select the object to tag and click Tag. The system moves the object to ‘Matching tagged objects.’
6. Repeat steps 4 through 5 to add additional objects to the tag.
7. Click Save.
To assign an individual item to a tag:
1. In the Back Office, select MENU > CATEGORIES & ITEMS.
2. Select the item to tag. The Item Details screen appears.
3. Click Tag. The Tag dialog appears.
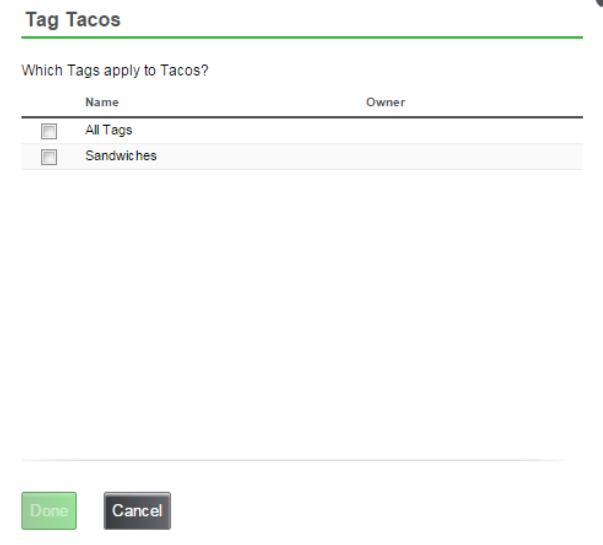
4. Select the tags to apply to the item.
5. Click Done. The system returns to the Item Details screen.
6. Click Save.
To assign an item with a variation to a tag:
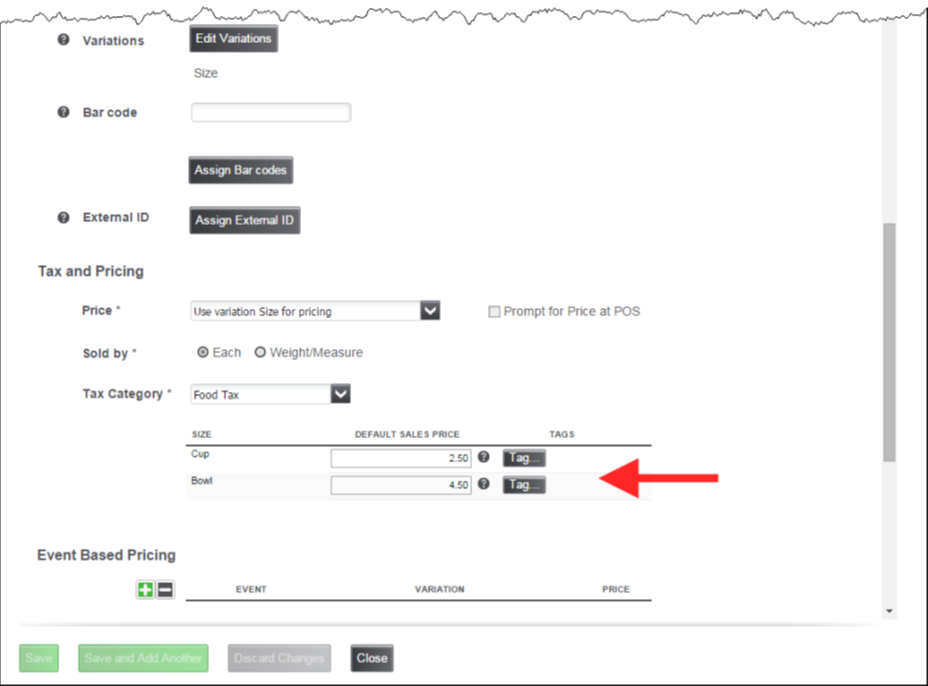
1. In Back Office, select MENU > CATEGORIES & ITEMS.
2. Select the item with variations to tag. The Item Details screen appears.
3. Under ‘Tax and Pricing,’ select the variation you want to tag and click Tag. The Tag dialog appears.
4. Select the tags to apply to the variation.
5. Click Done.
6. Click Save.
To assign a category to a tag:
1. In Back Office, select MENU > CATEGORIES & ITEMS.
2. Click for the category to tag. The Edit Category dialog appears.
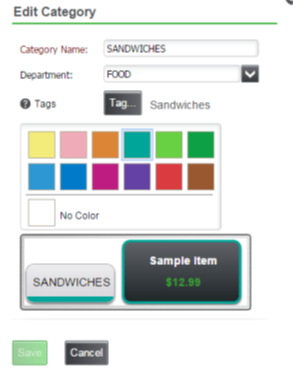
3. Click Tag. The Tag dialog appears.
4. Select the tags to apply to the category.
5. Click Done. The Edit Category dialog appears.
6. Click Save.
To assign a department to a tag:
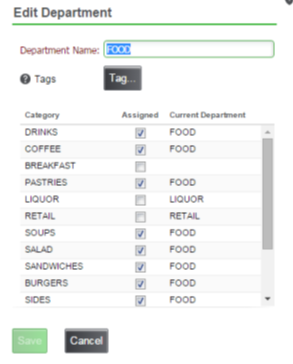
1. In Back Office, select MENU > DEPARTMENTS.
2. Click for the department to tag. The Edit Department dialog appears.
3. Click Tag. The Tag dialog appears.
4. Select the tags to apply to the department.
5. Click Done. The Edit Department dialog appears.
6. Click Save.
To remove a department, category, or item from a tag:
1. In Back Office, select MENU > TAGS.
2. Select the tag you want to edit.
3. Under ‘Matching tagged objects,’ select the object you want to remove from the tag.
4. Click Untag.
5. Click Save.
To delete a tag:
1. In Back Office, select MENU > TAGS.
2. Select the tag you want to delete.
3. Click Remove Tag. A warning prompt appears.
4. Click OK.
Tags are a way to group items for things such as promotions. Tags can include departments, categories, items, and items with variations, which are referred to as objects in this guide. When you configure a promotion, NCR Pro Restaurant uses tags to identify the items required for a promotion to apply.
Before you configure a promotion, you must first create a tag. Tag creation and editing occurs in Back Office and requires the access level ‘Tags.’ You can create a tag at the TAGS page or when creating a promotion. You can assign a department, category, item, or item with variation to a tag at the specific object page. For multi-site locations, you can only create and edit tags at the company–level. Tags are read-only at the store level.
Other important information regarding tags:
• You can have multiple tags.
• A department, category, item, or item with variation can belong to different tags.
• When you assign a department or a category to a tag, all items belonging to the department or category belong to the tag.
• You cannot create tags from the POS.
• The Item Import function does not support tag assignment.
• The Edit Multiple Items function does not support tag assignment.
• If a promotion uses a tag, you cannot delete the tag.
CONFIGURING TAGS
To create a tag and assign objects to the Tag:
1. In Back Office, select MENU > TAGS.
2. Click Add a Tag.
3. Type a name for the tag.
4. Type an external ID number (optional. Used in 3rd part solutions).
5. Select a method by which to filter the items available to tag from the drop-down box. The options are ‘All,’ ‘Departments,’ ‘Categories,’ ‘Items,’ and ‘Item variations.’ The system defaults to ‘All.’ The objects available to tag appear under ‘Matching untagged objects.’
OR
Type the name of the object to search and click to initiate a search. The search results appear under ‘Matching
untagged objects.’ You can type the entire name of the object or a string of characters. For example, if you type ‘be,’ the search results include all objects containing the character string ‘be.’
5. Under ‘Matching untagged objects,’ select the object to tag and click Tag. The system moves the object to ‘Matching tagged objects.’
6. Repeat steps 4 through 5 to add additional objects to the tag.
7. Click Save.
To assign an individual item to a tag:
1. In the Back Office, select MENU > CATEGORIES & ITEMS.
2. Select the item to tag. The Item Details screen appears.
3. Click Tag. The Tag dialog appears.
4. Select the tags to apply to the item.
5. Click Done. The system returns to the Item Details screen.
6. Click Save.
To assign an item with a variation to a tag:
1. In Back Office, select MENU > CATEGORIES & ITEMS.
2. Select the item with variations to tag. The Item Details screen appears.
3. Under ‘Tax and Pricing,’ select the variation you want to tag and click Tag. The Tag dialog appears.
4. Select the tags to apply to the variation.
5. Click Done.
6. Click Save.
To assign a category to a tag:
1. In Back Office, select MENU > CATEGORIES & ITEMS.
2. Click for the category to tag. The Edit Category dialog appears.
3. Click Tag. The Tag dialog appears.
4. Select the tags to apply to the category.
5. Click Done. The Edit Category dialog appears.
6. Click Save.
To assign a department to a tag:
1. In Back Office, select MENU > DEPARTMENTS.
2. Click for the department to tag. The Edit Department dialog appears.
3. Click Tag. The Tag dialog appears.
4. Select the tags to apply to the department.
5. Click Done. The Edit Department dialog appears.
6. Click Save.
To remove a department, category, or item from a tag:
1. In Back Office, select MENU > TAGS.
2. Select the tag you want to edit.
3. Under ‘Matching tagged objects,’ select the object you want to remove from the tag.
4. Click Untag.
5. Click Save.
To delete a tag:
1. In Back Office, select MENU > TAGS.
2. Select the tag you want to delete.
3. Click Remove Tag. A warning prompt appears.
4. Click OK.