Questions?
Contact us at support line.
US: 877-270-3475
or
Log in to back office to chat with a representative
Contact us at support line.
US: 877-270-3475
or
Log in to back office to chat with a representative
Visit NCR.com/Silver
Browse by categories
Printer Configuration
Use Configure printers at the Settings screen on a device to define the receipt and kitchen printers to use with the device. Prior to setting up kitchen printers, you must configure Kitchen Routing in the Back Office. See Setting up Kitchen Routing.
In some cases, for the network to recognize the printer, you must open port 9100.
To configure a device for receipt printing: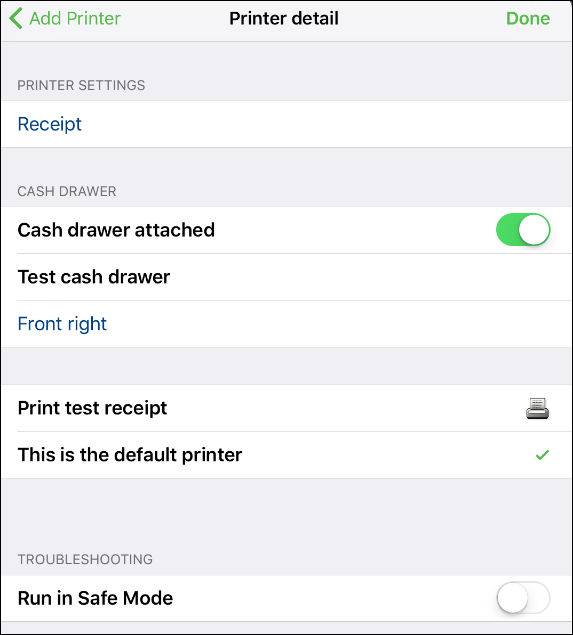
To configure a device for kitchen printing and label printing:
NOTE: If you chose LOCAL PRINTER, you have the option to enter a unique name for the kitchen printer.
Use Configure printers at the Settings screen on a device to define the receipt and kitchen printers to use with the device. Prior to setting up kitchen printers, you must configure Kitchen Routing in the Back Office. See Setting up Kitchen Routing.
In some cases, for the network to recognize the printer, you must open port 9100.
To configure a device for receipt printing:
- At the POS home screen, open the slide out menu.
- Tap Settings.
- At the Settings screen, tap Receipt printers.
- Tap Add Receipt Printer. The Add Printer screen appears.
- Tap a listed printer or Refresh, and then tap the desired printer. If your printer does not appear, you may need to specify the printer manually. See the section ‘Manually Specifying a Printer.
- Tap the printer you want to use as a receipt printer to display the ‘Printer options’ screen.
- Type a name for the printer.
- Under ‘CASH DRAWER,’ swipe the cash drawer button to the right to identify the selected receipt printer as connected to the cash drawer, if necessary. When you activate the attached cash drawer, the system opens the cash drawer and a menu prompt appears to confirm the successful opening of the cash drawer.
- You can associate multiple iPads to one printer and cash drawer combination. It is not necessary to have a cash drawer attached to a receipt printer; however, you will need to manually open a cash drawer.
When you associate a cash drawer to a receipt printer, the cash drawer, unless otherwise configured, automatically opens when you close a cash transaction. - (Drawer Checkout mode) Type a unique name for the cash drawer.
- Tap Set as default to identify the receipt printer as the default printer for the iPad.
- (Optional) Under ‘TROUBLESHOOTING,’ swipe the Run in Safe Mode button to the right to improve printing stability. Only enable this feature if you experience temporary network slowdowns, the printer often fails, or receipts get printed multiple times. If your store network works correctly, this option may increase printing times.
- Tap Done to exit the ‘Printer options’ screen.
- Tap Settings to return to the Settings screen.
To configure a device for kitchen printing and label printing:
- At the POS home screen, open the slide out menu.
- Tap Settings.
- At the Settings screen, tap Kitchen Printers or Label Printers.
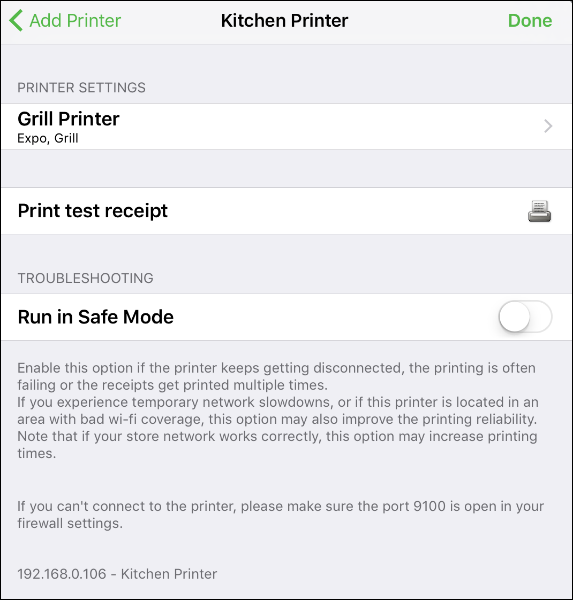
- Tap Local Printer to configure the kitchen printer ONLY for the iPad on which you are working, or tap Shared Printer to configure the kitchen printer as available for all iPads on your network.
- Tap a listed printer or Tap Refresh, and then tap the desired printer.
- If your printer does not appear, you may need to specify the printer manually. If your printer does not appear, you may need to specify the printer manually. See the section ‘Manually Specifying a Printer.’
- Tap the printer you want to use as a kitchen printer.
- Tap Kitchen printing. The Kitchen Devices screen appears.
- Tap the kitchen printer device to use for the printer, and then tap Done. The ‘Printer options’ screen appears. The system auto-fills the name of the printer with the kitchen device you selected.
NOTE: If you chose LOCAL PRINTER, you have the option to enter a unique name for the kitchen printer.
- (Optional) Under ‘TROUBLESHOOTING,’ swipe the Run in Safe Mode button to the right to improve printing stability. Only enable this feature if you experience temporary network slowdowns, the printer often fails, or receipts get printed multiple times. If your store network works correctly, this option may increase printing times.
- Tap Done.
- Tap Settings to return to the Settings screen.