Questions?
Contact us at support line.
US: 877-270-3475
or
Log in to back office to chat with a representative
Contact us at support line.
US: 877-270-3475
or
Log in to back office to chat with a representative
Visit NCR.com/Silver
Browse by categories
Price Lists are a convenient way for you to manage all of your prices in NCR Silver Pro Restaurant. Price Lists allow you to quickly update prices in one place in Silver Back Office without having to edit each item record. Additionally, you can schedule when you want the prices to take effect. Price Lists also enable you to schedule and manage pricing for events and promotions.
For multi-stores, you can use price lists to manage pricing for individual stores. Users assigned to a specific store can only see the price lists assigned to their store. Additionally, price lists can be created at the store level.
Price Lists allow you to set prices for:
You configure price lists in Silver Back Office. When you create a price list, you can associate it to an event or you can set a specific start date. If you do not assign an event or a specific start date, the start date is considered to be the current date and the new price list takes effect at the next data sync.
You can create a non-event based price list to manage your pricing.
Event-based price lists allow you to set the prices of items for an event on one screen, rather than having to edit each individual item. Prior to creating an event-based priced list, you must create the event at MENU > EVENTS.
You can easily edit a price list.
In some cases, you may want to duplicate an existing price list. For example, you created a price list for 2015 and now you want to create a price list for 2016. You can duplicate the 2015 price list and edit the prices.
In some cases, you may want to remove a price list. You can easily do so.
Event-based price lists have priority over non-event based price lists, when both are active. On occasions when two event-based price lists overlap, the POS uses the event-based price list with the higher ranking. You can sort event-based price lists to designate one with a higher ranking than the other should they overlap.
On the POS, you can view which price lists are currently active and which are upcoming.
For multi-stores, you can use price lists to manage pricing for individual stores. Users assigned to a specific store can only see the price lists assigned to their store. Additionally, price lists can be created at the store level.
Price Lists allow you to set prices for:
- Items and items with variations.
- Modifier items and modifier items with variations (as long as the modifier is set to be priced differently than the underlying item).
- Promotions using Set Price and Amount Off discounts.
- First, the POS checks for an active event-based price list. If two or more event-based price lists overlap (i.e., the events occur at the same time), the POS uses the price list with the higher ranking. (See ‘Ranking Event-Based Price Lists.’)
- If an active event-based price list does not exist, the POS checks for an active non-event based price list.
- (Multi-store only) If a non-event based price list does not exist, the POS uses the store override price, if any.
- If a non-event based price list does not exist and a store override price does not exist, the POS uses the company price. This is the price assigned to the object on the corresponding item or modifier record.
- First, the POS checks for an active event-based price list. If two or more event based price lists overlap, the POS uses the price list with the higher ranking. (See ‘Ranking Event-Based Price Lists.’)
- If a active event-based price list does not exist, the POS checks an active non-event based price list.
- If an active non-event based price list does not exist, the POS uses the value from the promotions page.
Configuring Price Lists
You configure price lists in Silver Back Office. When you create a price list, you can associate it to an event or you can set a specific start date. If you do not assign an event or a specific start date, the start date is considered to be the current date and the new price list takes effect at the next data sync.
Configuring a Price List
You can create a non-event based price list to manage your pricing.
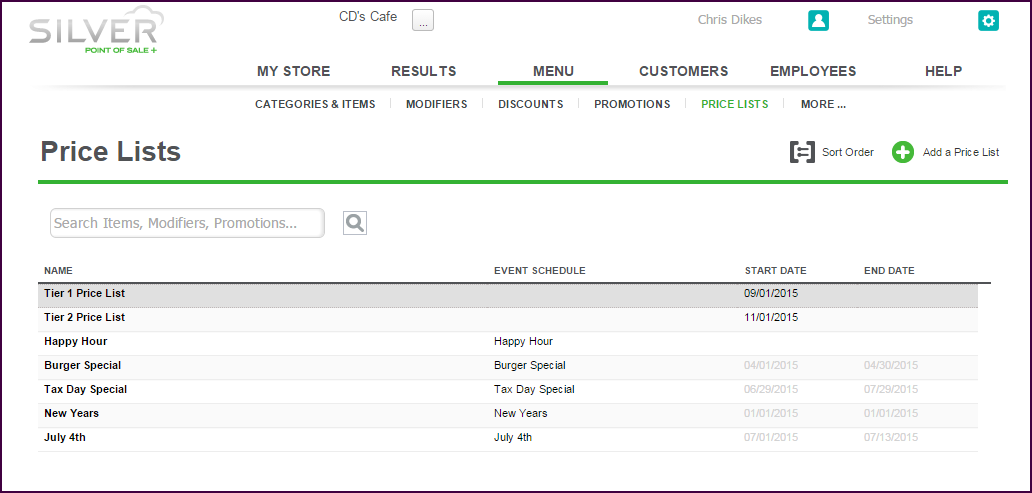
- In Silver Back Office, select MENU > PRICE LISTS.
- Select ADD A PRICE LIST.
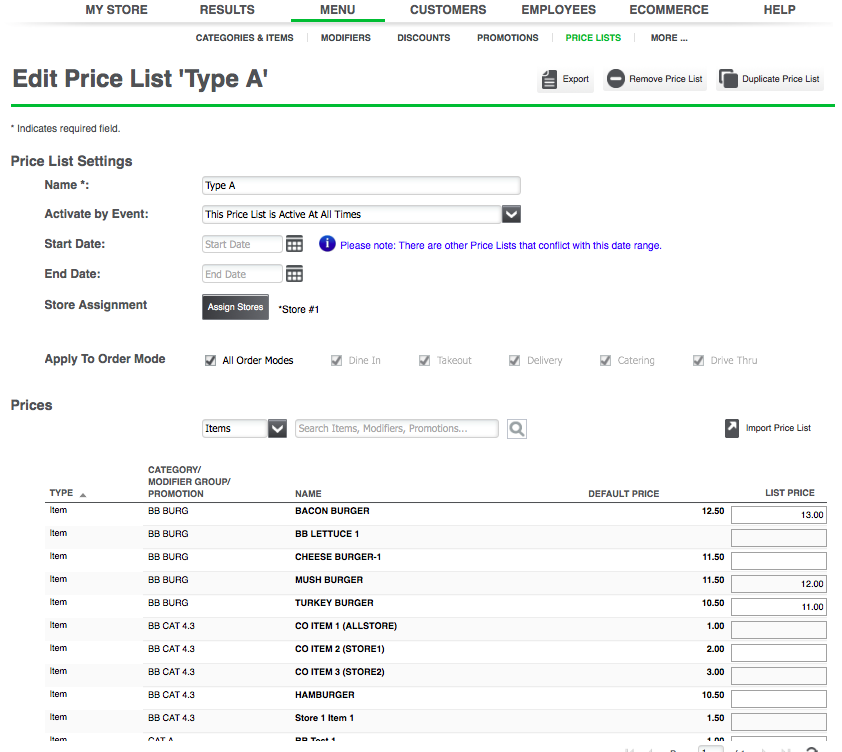
- Under ‘Price List Settings,’ type a name for the price list.
- Use the default setting, ‘This Price List is Active At All Times.’ You can use the start and end date to control the activation of the price list. To create a price list with an event, see ‘Configuring an Event-Based Price List.’
- (Optional) Select a start date for the price list. The start date allows you to create a price list and have it take effect on a certain date, rather than immediately. If you want the price list to take effect immediately, leave the start date blank.
- (Optional) Select an end date. If you do not want to have an end date for the price list, leave end date blank.
If you have a price list with a start date of 01/01/2015 and no end date, and a second price list with a start date of 09/01/2015 and no end date, the first price list remains active until 09/01/215 when the second price list takes effect.
- (Multi-Store only) Click Assign Stores to assign the price list to a store. The Stores screen appears. Select the stores for which to assign the price list and click Done. When you assign a price to a store, it is active for the store as well. At the store level, a store can choose to make an assigned price list inactive.
- Select which Order Modes the price list should be applied to.
- Under ‘Prices,’ select the filter by which to edit prices from the drop-down list . The options are ‘All,’ Items,’ ‘Modifiers,’ and ‘Promotions.’
-OR-
Type the name of the object for which to search and click to initiate a search. You can type the entire name of the object or a string of characters. For example, if you type ‘be,’ the search results include all objects containing the character string ‘be.’
The matching objects appear on the screen. Each object is identified with:
Type the name of the object for which to search and click
The matching objects appear on the screen. Each object is identified with:
- An object type, such as ‘Item,‘ ’Item Variation,’ ‘Modifier,’ ‘Modifier Variation,’ and ‘Promotion.’
- An object identifier, such as ‘Category,’ ‘Modifier Group,’ or ‘Promotion.’
- The item name.
- The default price, which is the price of the object on the individual record.
- Under ‘List Price,’ type the price for the item.
- Click Save.
Configuring an Event-Based Price List
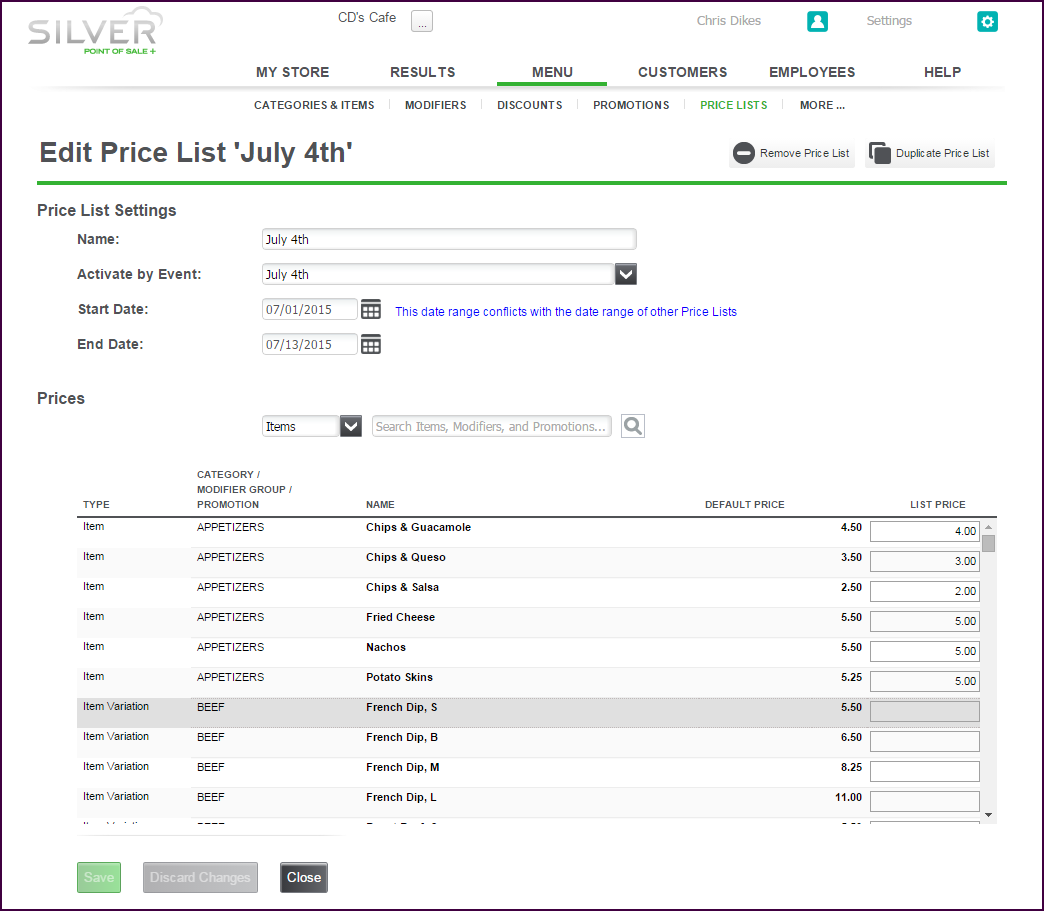
Event-based price lists allow you to set the prices of items for an event on one screen, rather than having to edit each individual item. Prior to creating an event-based priced list, you must create the event at MENU > EVENTS.
- In Silver Back Office, select MENU > PRICE LISTS.
- Select ADD A PRICE LIST.
- Under ‘Price List Settings,’ type a name for the price list.
- Select an event from the drop-down list to associate with the price list. When you select an event for a price list, you cannot add a start date or an end date for the price list. The occurrence of the price list for the event is determined by the event configuration on the Events page.
- (Multi-Store only) Click Assign Stores to assign the price list to a store. The Stores screen appears. Select the stores for which to assign the price list and click Done.
- Select which Order Modesthe price list should be applied to.
- Under ‘Prices,’ select the filter by which to edit prices from the drop-down list . The options are ‘All,’ Items,’ ‘Modifiers,’ and ‘Promotions.’
-OR-
Type the name of the object for which to search and click to initiate a search. You can type the entire name of he object or a string of characters. For example, if you type ‘be,’ the search results include all objects containing the character string ‘be.’
The matching objects appear on the screen. Each object is identified with:
The matching objects appear on the screen. Each object is identified with:
- An object type, such as ‘Item,’ ‘Item Variation,’ ‘Modifier,’ ‘Modifier Variation,’ and ‘Promotion.’
- An object identifier, such as ‘Category,’ ‘Modifier Group,’ or ‘Promotion.’
- The item name.
- The default price, which is the price of the object on the individual record.
- Under ‘List Price,’ type the price for the item.
- Click Save.
Editing a Price List
You can easily edit a price list.
- In Silver Back Office, select MENU > PRICE LISTS.
- Select the price list you want to edit. The Edit Price List screen appears.
- Make the necessary changes.
- Click Save.
Duplicating a Price List
In some cases, you may want to duplicate an existing price list. For example, you created a price list for 2015 and now you want to create a price list for 2016. You can duplicate the 2015 price list and edit the prices.
- In Silver Back Office, select MENU > PRICE LISTS.
- Select the price list you want to duplicate.
- Click Duplicate Price List on the top right of the screen. The system duplicates the price list and retains all of the information except the name. In Multi-Store, if you assigned the original price list to a specific set of stores, the duplicated price list will be assigned to those same stores. Click Assign Stores to edit the store assignment of the price list.
- Type a name for the duplicated price list.
- Make any other necessary changes.
- Click Save.
Removing a Price List
In some cases, you may want to remove a price list. You can easily do so.
- In Silver Back Office, select MENU > PRICE LISTS.
- Select the price list you want to remove.
- Click Remove Price List on the top right of the screen. A prompt appears.
- Click OK. The system removes the price list and returns to the Price Lists screen.
Ranking Event-Based Price Lists
Event-based price lists have priority over non-event based price lists, when both are active. On occasions when two event-based price lists overlap, the POS uses the event-based price list with the higher ranking. You can sort event-based price lists to designate one with a higher ranking than the other should they overlap.
- In Silver Back Office, select MENU > PRICE LISTS.
- Click Sort Order on the top right side of the screen.
- Select the price list you want to sort.
- Click
to move a price list up one level or click
to move a price list down one level.
- Click Done Sorting.
Viewing Price Lists on the POS
On the POS, you can view which price lists are currently active and which are upcoming.
- At the POS home screen, tap to view the slide out menu.
- Tap Details.
- Tap Price Lists. The Price Lists screen appears.

- Tap Details.
- Tap Close.