Questions?
Contact us at support line.
US: 877-270-3475
or
Log in to back office to chat with a representative
Contact us at support line.
US: 877-270-3475
or
Log in to back office to chat with a representative
Visit NCR.com/Silver
Browse by categories
Discounts are a great way to provide incentive to customers to come to your store and purchase more items. From the Back Office, you can:
You can set up item and ticket-level discounts. This allows employees to apply a single discount to each item and an overall discount to an entire sale in the POS app. With our system, your discounts will “stack”, allowing both types of discounts to be applied to an item. Item-level discounts will always be applied first, followed by ticket-level discounts.
Note: You can only assign one item-level discount to an item, and you can only assign one ticket-level discount to a ticket. You can assign an item-level discount to item(s) and a ticket-level discount to the same ticket.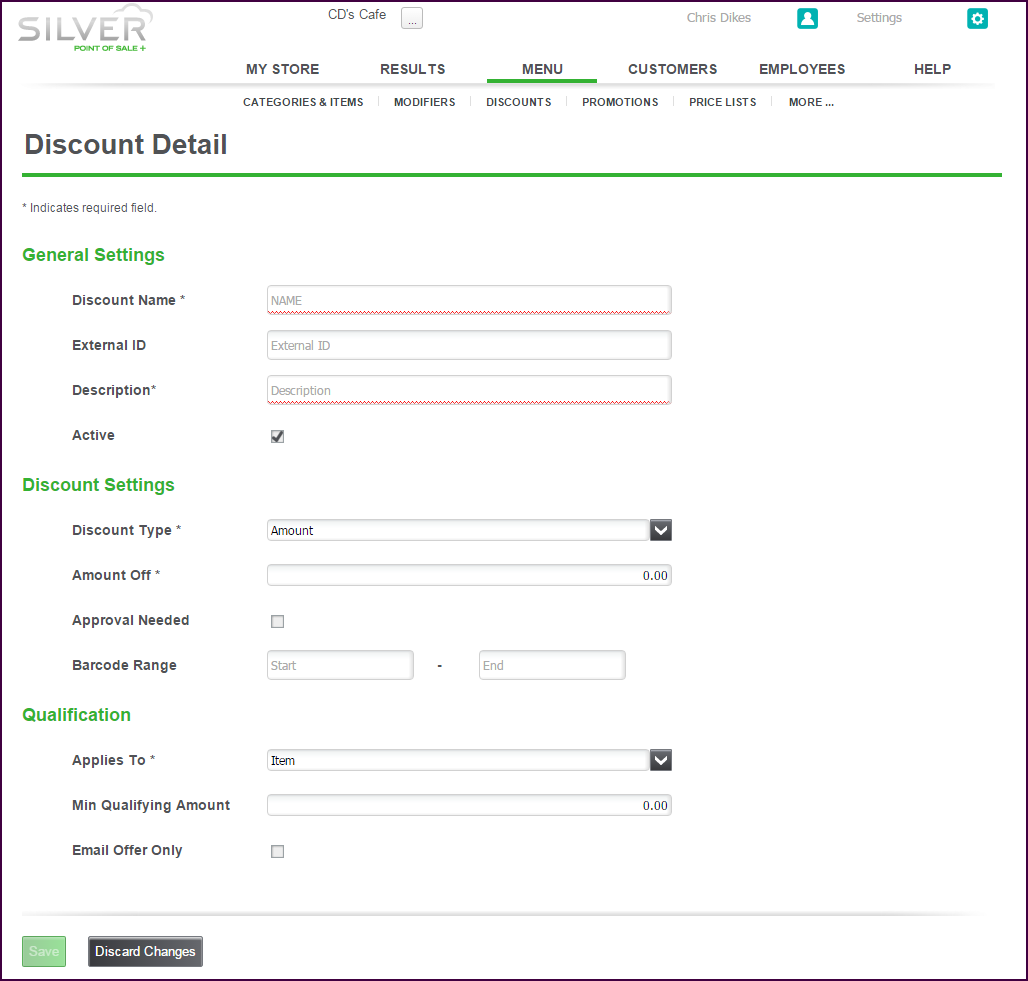
Adding a Discount
You can set up item and ticket-level discounts. This allows employees to apply a single discount to each item and an overall discount to an entire sale in the POS app. With our system, your discounts will “stack”, allowing both types of discounts to be applied to an item. Item-level discounts will always be applied first, followed by ticket-level discounts. Note: You can only assign one item-level discount to an item, and you can only assign one ticket-level discount to a ticket. You can assign an item-level discount to item(s) and a ticket-level discount to the same ticket.
- Select MENU > DISCOUNTS.
- Select Add a Discount.
- Type a name for the discount. For discounts you plan to include in barcodes as part of email marketing, the name cannot contain any spaces.
- (Optional) Type an external ID for the discount. You can leave this field blank and the system will automatically assign an external ID to the discount when you save the record.
- Type a description for the discount.
- Optional) Clear active to deactivate the discount. By default, all new discounts are active.
- (Optional) Clear Show the discount on Activity Summary charts to not have the discount calculated as part of the totals on the Activity Summary page. For example, you may not want to have Employee Discounts appear as part of the Discounts and Promotions calculation on the Activity Summary page to give you a more accurate reflection of the effectiveness of your discounts and promotions.
- Select the discount type from the drop-down list.
- Amount provides for a fixed dollar discount amount. You must type the amount for the discount.
- Percent provides for a fixed discount percentage. You must type the percentage for the discount.
- Prompted Amount allows you to change the discounted amount during a sale.
- Prompted Percent allows you to change the discount percentage during a sale.
- Set Item Price allows you to create a discount price to apply to an item. You must type the item price for the discount. For example, if you sell many types of beers with different prices, you can create a special such as ‘All Bottled Beer, $3.00 All Day Tuesday.’
- Type the amount or percentage for the discount.
- (Optional) Select Approval Needed for a manager to authorize the discount on the POS.
- (Optional) Type the starting and ending barcode range for the discount. The following apply to the barcode range:
- The barcode range must involve at least 1 alphanumeric character and no more than 20.
- The length of the start and end of the barcode strings must be the same.
- The barcode end range must be the same or greater than the barcode start range.
- The barcode ranges do not need to be unique across promotions.
- Select either Item or Ticket, to specify the level at which to apply the discount.
- If this is an item discount, type the minimum item price required to apply the discount.
-OR-
If this is a ticket discount, type the minimum sale amount required to apply the discount.
-OR-
Leave the amount as $0.00, if a minimum item price or sale amount is not required to apply the discount.
- Select Email Offer Only to use the discount in your email marketing feature.
- Click Save.
Duplicating a Discount
Quickly duplicate existing discounts on a company or store level.- Select MENU > DISCOUNTS.
- Scroll through the list of your discounts and click on the row of the discount that you want to duplicate.
- Click on the Duplicate button in the upper right hand corner.
- The newly created discount will have all the fields pre populated except for the “Name” and “External ID”.
- Edit the details for the discount and click Save.
Editing or Removing a Discount
You can edit an existing discount or remove a discount you no longer want to maintain. To do this:- Select MENU > DISCOUNTS.
- Scroll through the list of your discounts and click on the row of the discount that you want to edit or remove.
- Do one of the following:
- To remove the discount, select Remove Discount and confirm the removal. If the selected discount is tied to a marketing email, the system will let you know, so that you can determine if you still want to remove the discount.
- Edit the details for the discount and click Save.