After you physically set up your hardware, you will need to configure your printers in the POS app. We support two categories of printers:
Receipt Printer - used for customer receipts and to provide a means for signature capture for credit card transactions.
Kitchen Printer - used to print a kitchen "chit". A chit contains instructions to the kitchen on how to prepare an item. Kitchen chits do not look just like regular receipts, they display the item name and how to prepare it (via modifiers), and table information (if table assignment is turned on), but it does not include any price information.
Note: If you only have one printer, it can be used as both a receipt printer and a kitchen printer.
Once you have set up your printer with your other hardware and have configured your network:
-
From the Slide Out Menu, tap Settings
-
Tap Configure printers.
-
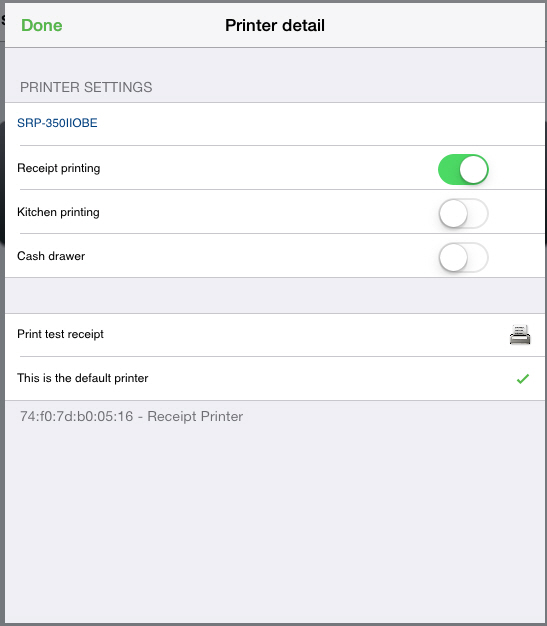
Tap  for your printer to open the Printer detail screen.
-
Give your printer a name that designates his purpose and/or location, such as Kitchen Printer or Front Counter Printer.
-
Define the printer's role:
-
Receipt printing: Turn Receipt printing ON if you want the printer to be able to print a receipt at the end of a transaction or during a hold/recall.
-
Kitchen printing: Turn Kitchen printing ON if you want the printer to be able to print a kitchen chit automatically after completing a transaction or holding a ticket.
-
If you are only using your printer for receipt printing, skip to step 10. If you are configuring a kitchen printer, continue with step 7.
-
Once you've turned on kitchen printer, you will see an additional field called Printer groups. Tap this to see the available printer groups.
-
Tap the printer group that you want this printer to be associated with. Note - each printer group must be assigned to at least one printer, or the items assigned to that printer group will not be sent to any kitchen printer.
-
Tap Done to return to the main page.
- Set the Cash drawer setting to ON if there is a cash drawer connected to the printer.
-
Tap Print test receipt to test your printer setup.: configuring printers, printers, printer settings