Questions?
Contact us at support line.
US: 877-270-3475
or
Log in to back office to chat with a representative
Contact us at support line.
US: 877-270-3475
or
Log in to back office to chat with a representative
Visit NCR.com/Silver
Browse by categories
The reports in Silver Back Office enable you to analyze and monitor your restaurant. NCR Silver Pro Restaurant divides the Silver Back Office reports into four sections: Operations, Sales, Customers, and Lists. All of the reports, except for lists, allow you to customize the time period for the report. You can either print the reports, or export the reports into a number of different formats.
The following is a list, in menu order, of the NCR Silver Pro Restaurant reports available to you and their key benefits:
You can easily access and run a report in Silver Back Office.
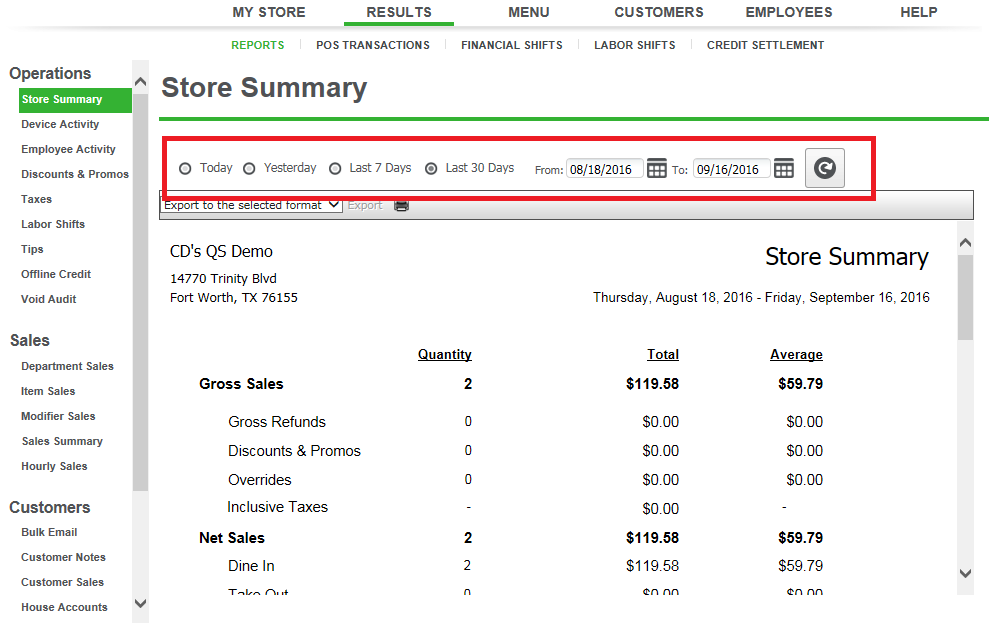
Under ‘From,’ and ‘To,’ use the right and left arrows to select a start and end date.
Key Benefits of the Silver Back Office Reports
The following is a list, in menu order, of the NCR Silver Pro Restaurant reports available to you and their key benefits:
| Reports | Description |
|---|---|
| Store Summary | Provides you with a summary of your sales activity for a selected time period. |
| Device Activity | Enables you to review the sales activity entered through each device. |
| Employee Activity | Enables you to review the sales activity entered by each employee. |
| Location Activity | Enables you to review the sales activity for each location. |
| Discounts and Promos | Provides you with an overview of the discounts and promos redeemed in your restaurant. |
| Taxes | Provides you with a breakdown of the taxes collected by tax jurisdiction. |
| Labor Shifts | Enables you to review the times your employees clock in and out and the total hours worked for a selected time period. |
| Financial Shifts | Enables you to review open and closed financial shift details such as sales, declared cash and over/short values. |
| Tips | Provides a report of the total amount of credit card tips declared by an employee. |
| Offline Credit | Enables you to review the offline credit transactions processed by device. |
| Void Audit | Provides you with a list and amount of the voided and cleared items entered by each employee according to date and transaction. |
| Department Sales | Enables you to track the sales activity for each department. |
| Item Sales | Enables you to track the sales activity for each item. |
| Modifier Sales | Enables you to track the sales activity for each modifier. |
| Sales Summary | Provides you with an overview of your sales and enables you to look for sales trends. |
| Hourly Sales | Provides you with a breakdown of your sales by hour and enables you to look for sales trends. |
| Bulk Email | Enables you to track the effectiveness of your marketing email messages. |
| Customer Notes | Displays the notes entered for your customers. |
| Customer Sales | Provides you with a sales summary by customer. |
| House Accounts | Provides you with a list of house accounts. |
| House Accounts Activity | Enables you to view the activity for all of your house accounts. |
| Items | Displays all of the items on your menu according to category. |
| Customers | Displays a list of all of your customers. |
| Devices | Displays a list of all devices associated with your restaurant. |
Accessing a Report
You can easily access and run a report in Silver Back Office.
-
In Silver Back Office, select Results > Reports.
-
Click the report you want to run. When you select a report, the system automatically generates the report. If you configure the report, such as the time period, or add a filter to the report, click
to refresh the report data.
Choosing a Report Date Range
The reports in Silver Back Office allow you to select a specific date or date range to run the report. The Reports function contains pre-configured dates and date ranges for you to use, or you can select your own date or date range.
-
On the Reports menu, select a report to run. The system generates the report in the Report Preview screen.

-
Select one of the pre-configured date ranges, such as ‘Today,’ ‘Last 7 Days,’ and ‘Last 30 Days.’
-OR-
Under ‘From,’ and ‘To,’ use the right and left arrows to select a start and end date.
-
Click
to refresh the report data. The report appears in the Report Preview screen.
Exporting Report Data
You can export each report in Silver Back Office to a variety of file formats. For example, you may want to export your Customers list to an Excel file to create a ‘Mail Merge’ with Microsoft® Word®.
-
On the Reports menu, select, configure, and generate a report. The report appears in the Report Preview screen.
-
In the Report Preview toolbar, select a format to which to export your report data from the drop-down list.
-
Click Export. A Windows prompt appears.
-
Click Save As from the drop-down list at the bottom of the screen. The ‘Save As’ screen appears.
-
Navigate to a folder on your system to save the file.
-
Type a file name that best meets your operational needs.
-
Click Save.
