Questions?
Contact us at support line.
US: 877-270-3475
or
Log in to back office to chat with a representative
Contact us at support line.
US: 877-270-3475
or
Log in to back office to chat with a representative
Visit NCR.com/Silver
Browse by categories
Store Information Overview
Store information enables you to designate information to appear on the customer receipt and to configure store specific settings. The settings are split into Store Configuration and Store Options.

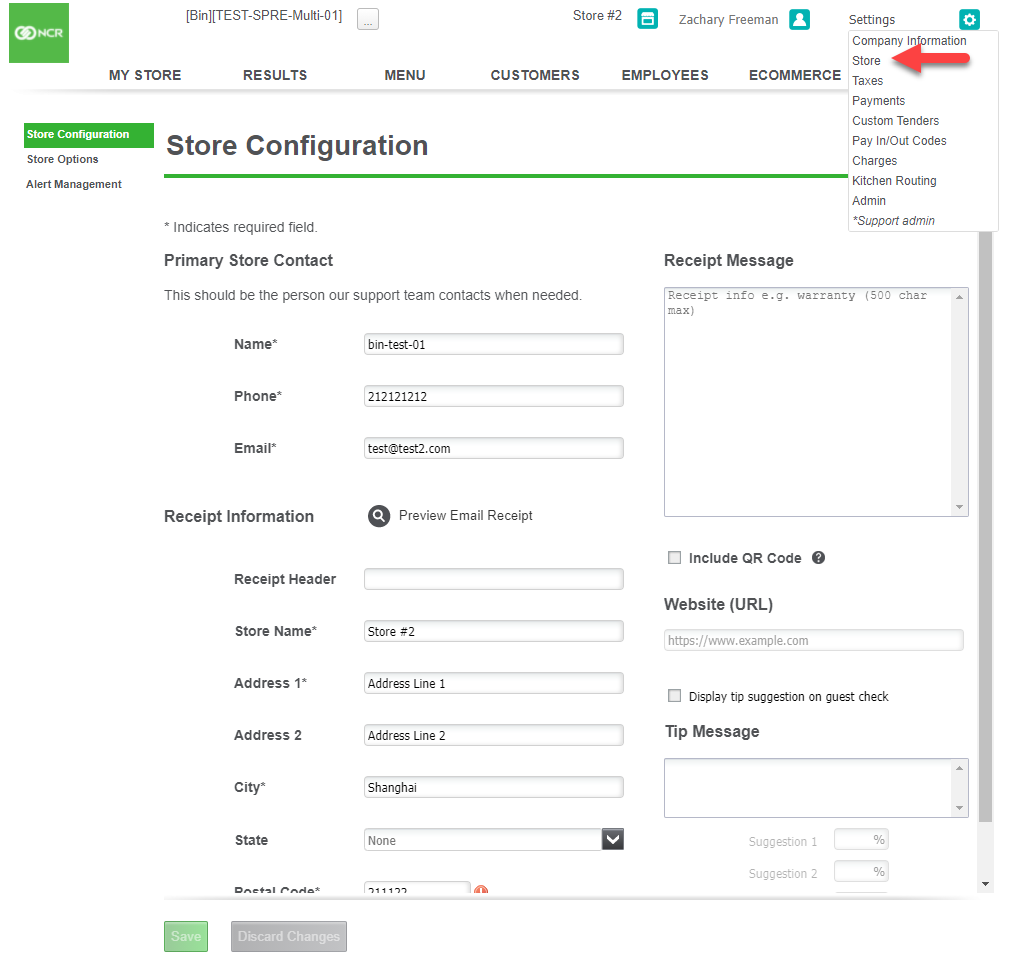
1. Select Settings > Store. The Store Configuration will appear.
2. Review and edit the name, phone number, and email address of the primary store contact for NCR support, if necessary. The system retrieves the information entered when creating your account.
3. Under ‘Receipt information, type the store name.
Any information you enter under ‘Receipt information’ appears on the receipts you provide to your customers.
4. Type the address. You can optionally type additional address information in Address 2.
5. Type the city, state, and zip code.
6. Type the store phone number.
7. In Receipt Message, type any additional information you want to appear on your receipts.
8. (Optional) Enter a URL to print on receipts as a QR code.
9. Click Preview Email Receipt to view a receipt on the screen.
10. Select Tip Message to type a message and set tip amount suggestions to appear on the guest check.
11. Click Save.
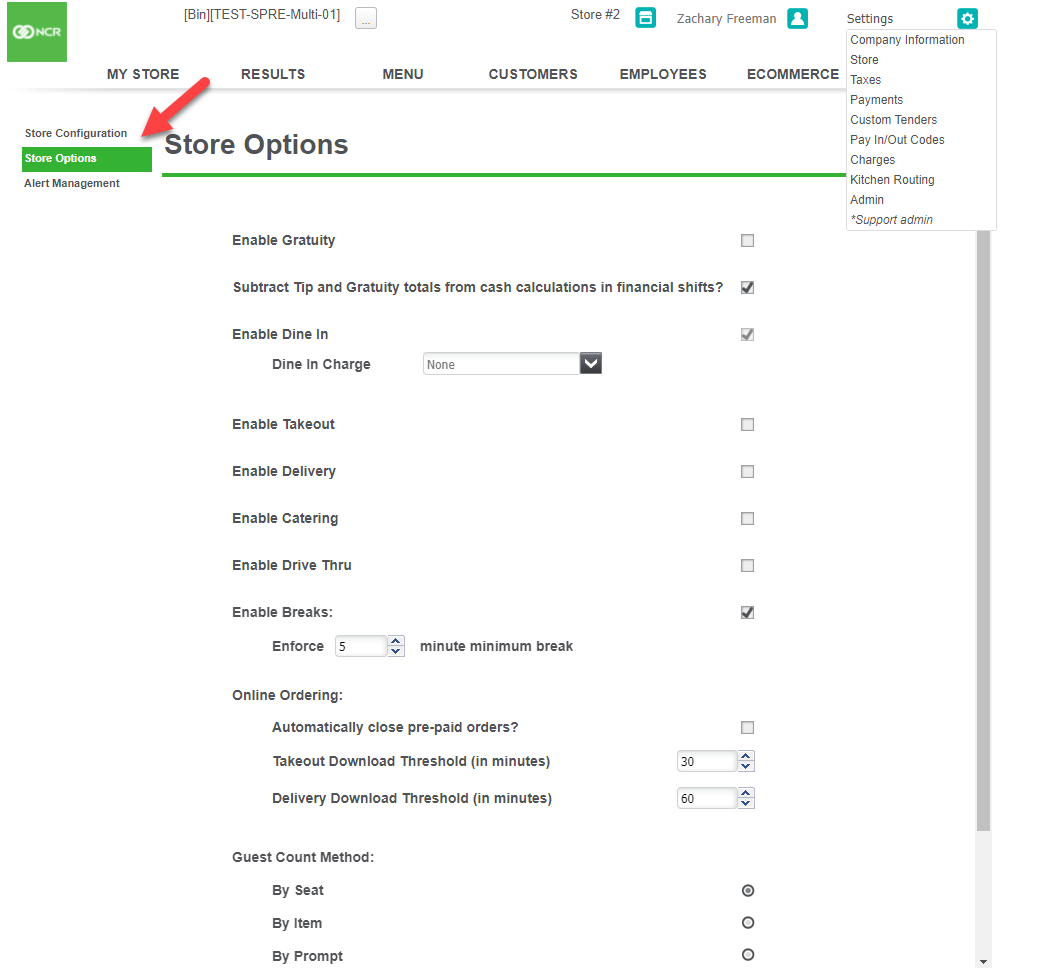
12. Click Store Options on the left side of the screen.

13. Select Gratuity to allow customers to provide non-cash tips. When you select ‘Gratuity,’ it is necessary to define a gratuity tax under Settings > Taxes, if you are subject to gratuity tax.
14. Select Subtract Tip and Gratuity totals from cash calculations in financial shifts to have the system remove employee tips and gratuities earned from the ‘Total Cash Owed’ amount at the end of a shift. By default, the system enables this feature. By enabling the feature, the employee potentially keeps any tips earned. To not have the system subtract tips and gratuity totals from the ’Total Cash Owed’ amount, clear this feature.
15. Select which Order Modes to enable. When you select this feature, Silver Back Office adds the Phone/Drive Thru icon to the POS home screen and additional options appear. Enabling different order mode allows you to manage a queue specific to that order type.
• (Optional) Select a charge to apply to active order types. You can also have a charge automatically apply to a ticket when you select takeout or delivery order mode. You must first setup a charge.
16. (Optional) Select a Dine in Charge to add charges to dine in orders, for example a license tax (See Charges section for more detail).
17. Click Enable Breaks to add the option for employees to take non-paid breaks during their shift. When an employee logs in to the POS and clocks in, a Start Break icon is added to the POS home screen.
18. (Optional) Select Automatically close pre-paid orders for online orders. When you select this feature, fully paid online orders will not appear in the Takeout/Delivery queue and will not require you to close the order. Rather, as soon as the POS receives the order, a customer receipt prints and the order is closed. Note: This feature does not appear until you receive at least one online order.
19. (Optional) Enter a takeout download threshold time for online orders designated as takeout to print a kitchen chit. By default, the POS prints a kitchen chit to the defined kitchen printers 30 minutes prior to the order target time.
20. (Optional) Enter a delivery download threshold time for online orders designated as delivery to print a kitchen chit. By default, the
POS prints a kitchen chit to the defined kitchen printers 60 minutes prior to the order target time.
21. (Optional) You can change your preferred method of guest counting.
• Table Service users can count by occupied seat (the default), by guest count prompt or by items.
• Quick Service users can count as 1 guest per transaction (the default mode), by prompt or by item.
22. Click Save.
Store information enables you to designate information to appear on the customer receipt and to configure store specific settings. The settings are split into Store Configuration and Store Options.
1. Select Settings > Store. The Store Configuration will appear.
2. Review and edit the name, phone number, and email address of the primary store contact for NCR support, if necessary. The system retrieves the information entered when creating your account.
3. Under ‘Receipt information, type the store name.
Any information you enter under ‘Receipt information’ appears on the receipts you provide to your customers.
4. Type the address. You can optionally type additional address information in Address 2.
5. Type the city, state, and zip code.
6. Type the store phone number.
7. In Receipt Message, type any additional information you want to appear on your receipts.
8. (Optional) Enter a URL to print on receipts as a QR code.
9. Click Preview Email Receipt to view a receipt on the screen.
10. Select Tip Message to type a message and set tip amount suggestions to appear on the guest check.
11. Click Save.
12. Click Store Options on the left side of the screen.
13. Select Gratuity to allow customers to provide non-cash tips. When you select ‘Gratuity,’ it is necessary to define a gratuity tax under Settings > Taxes, if you are subject to gratuity tax.
14. Select Subtract Tip and Gratuity totals from cash calculations in financial shifts to have the system remove employee tips and gratuities earned from the ‘Total Cash Owed’ amount at the end of a shift. By default, the system enables this feature. By enabling the feature, the employee potentially keeps any tips earned. To not have the system subtract tips and gratuity totals from the ’Total Cash Owed’ amount, clear this feature.
15. Select which Order Modes to enable. When you select this feature, Silver Back Office adds the Phone/Drive Thru icon to the POS home screen and additional options appear. Enabling different order mode allows you to manage a queue specific to that order type.
• (Optional) Takeout, Delivery and Catering orders have an additional option called Simple Order Name. When active, simple order name allows you to enter a one-time-use name for the order instead of creating an additional customer record in your system for every order.
• (Quick Service Only) Select Prompt for Order Mode to prompt employees to select Dine In or Takeout for customer orders.
• (Quick Service Only) Select Print ‘Dine In’ on Kitchen Chits to print ‘***DINE IN***’ on kitchen chits for dine in orders. Otherwise, a header identifying an order as a Dine In order does not print on the kitchen chit. Takeout and Delivery always prints on kitchen chits for those order modes.
• (Optional) Select a charge to apply to active order types. You can also have a charge automatically apply to a ticket when you select takeout or delivery order mode. You must first setup a charge.
16. (Optional) Select a Dine in Charge to add charges to dine in orders, for example a license tax (See Charges section for more detail).
17. Click Enable Breaks to add the option for employees to take non-paid breaks during their shift. When an employee logs in to the POS and clocks in, a Start Break icon is added to the POS home screen.
• Type the minimum amount of minutes to enforce for breaks, which is the required amount of time an employee must remain on break. If an employee wishes to return to break early, a supervisor’s approval is required.
18. (Optional) Select Automatically close pre-paid orders for online orders. When you select this feature, fully paid online orders will not appear in the Takeout/Delivery queue and will not require you to close the order. Rather, as soon as the POS receives the order, a customer receipt prints and the order is closed. Note: This feature does not appear until you receive at least one online order.
19. (Optional) Enter a takeout download threshold time for online orders designated as takeout to print a kitchen chit. By default, the POS prints a kitchen chit to the defined kitchen printers 30 minutes prior to the order target time.
20. (Optional) Enter a delivery download threshold time for online orders designated as delivery to print a kitchen chit. By default, the
POS prints a kitchen chit to the defined kitchen printers 60 minutes prior to the order target time.
21. (Optional) You can change your preferred method of guest counting.
• Table Service users can count by occupied seat (the default), by guest count prompt or by items.
• Quick Service users can count as 1 guest per transaction (the default mode), by prompt or by item.
22. Click Save.
