Questions?
Contact us at support line.
US: 877-270-3475
or
Log in to back office to chat with a representative
Contact us at support line.
US: 877-270-3475
or
Log in to back office to chat with a representative
Visit NCR.com/Silver
Browse by categories
Categories, Departments & Items in the Back Office
Categories
By grouping your merchandise into categories, you can put similar inventory items together. For example, if you sell sporting goods, you might define a category for each sport, such as golf, tennis, basketball, etc. If you own a book store, you can group items by type, such as hard cover, soft cover, large print, etc.
Grouping items into categories will also make finding items in the POS app much easier for your employees. Also, the reports in the Back Office use item categories to consolidate key sales information. For example, you can track profits by how well each category is selling.
If you are having trouble deciding what categories to use, start by creating very broad categories. You can always change them or add more specific categories later.
In this article, you will learn how to:
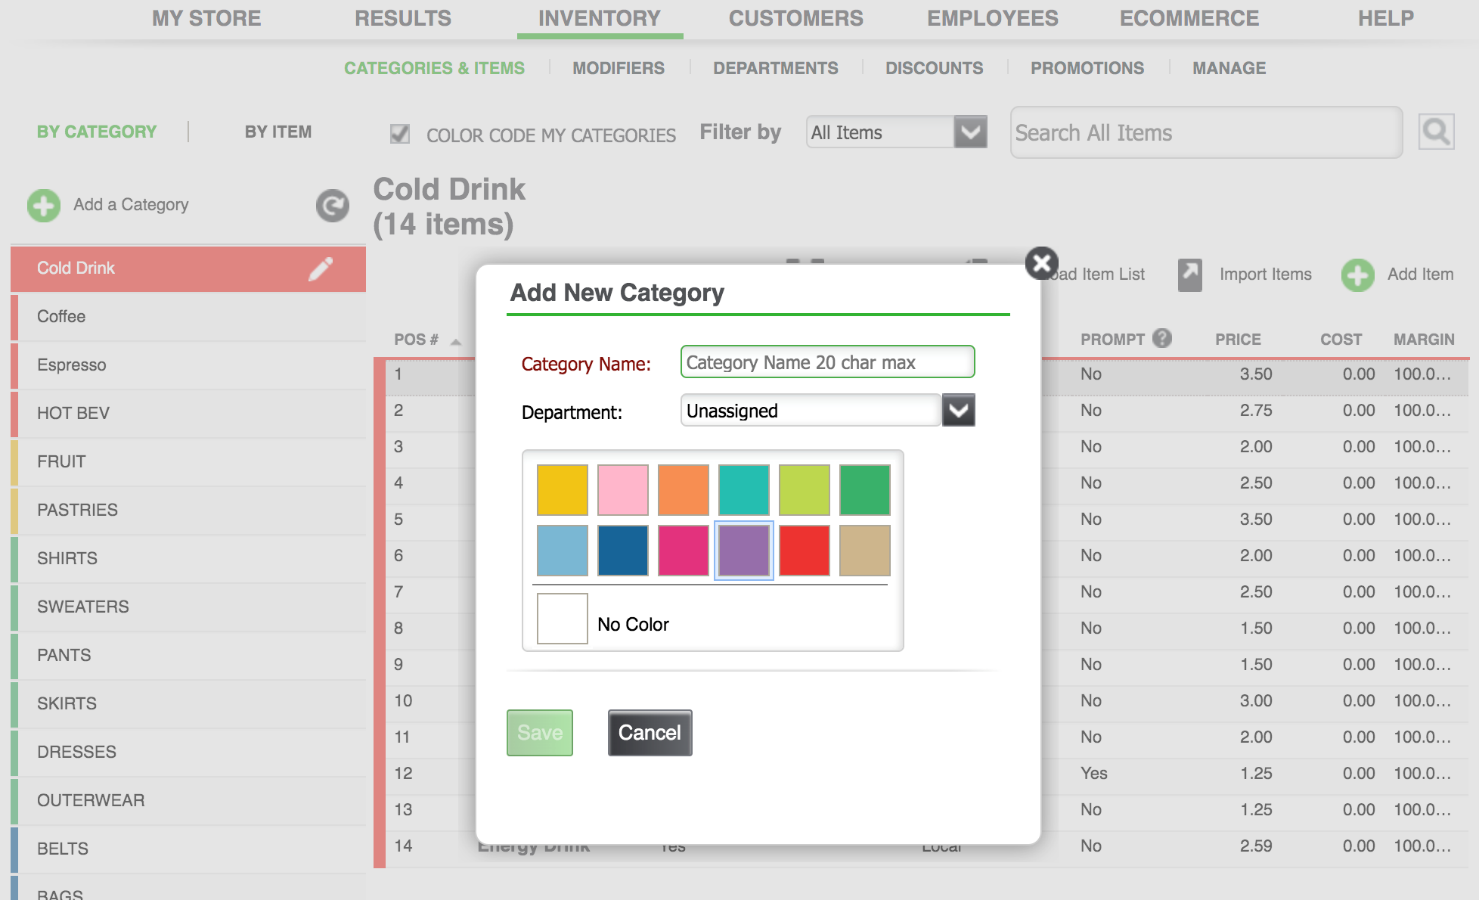
Add a Category
Multi-store customer? You need to be in Company View to add and edit your items and categories.
NOTE: The Color Code My Categories checkbox is selected by default, but you can uncheck this option if you prefer to not color code your categories.
Edit or Remove a Category
NOTE: Removing a category is a "soft delete". This means that although the category is removed from your view, all the data and activity associated with that category is still shown in reports, transactions, etc..
If you want to edit or remove a category:

The Department section currently has five default Departments. To add a new Department: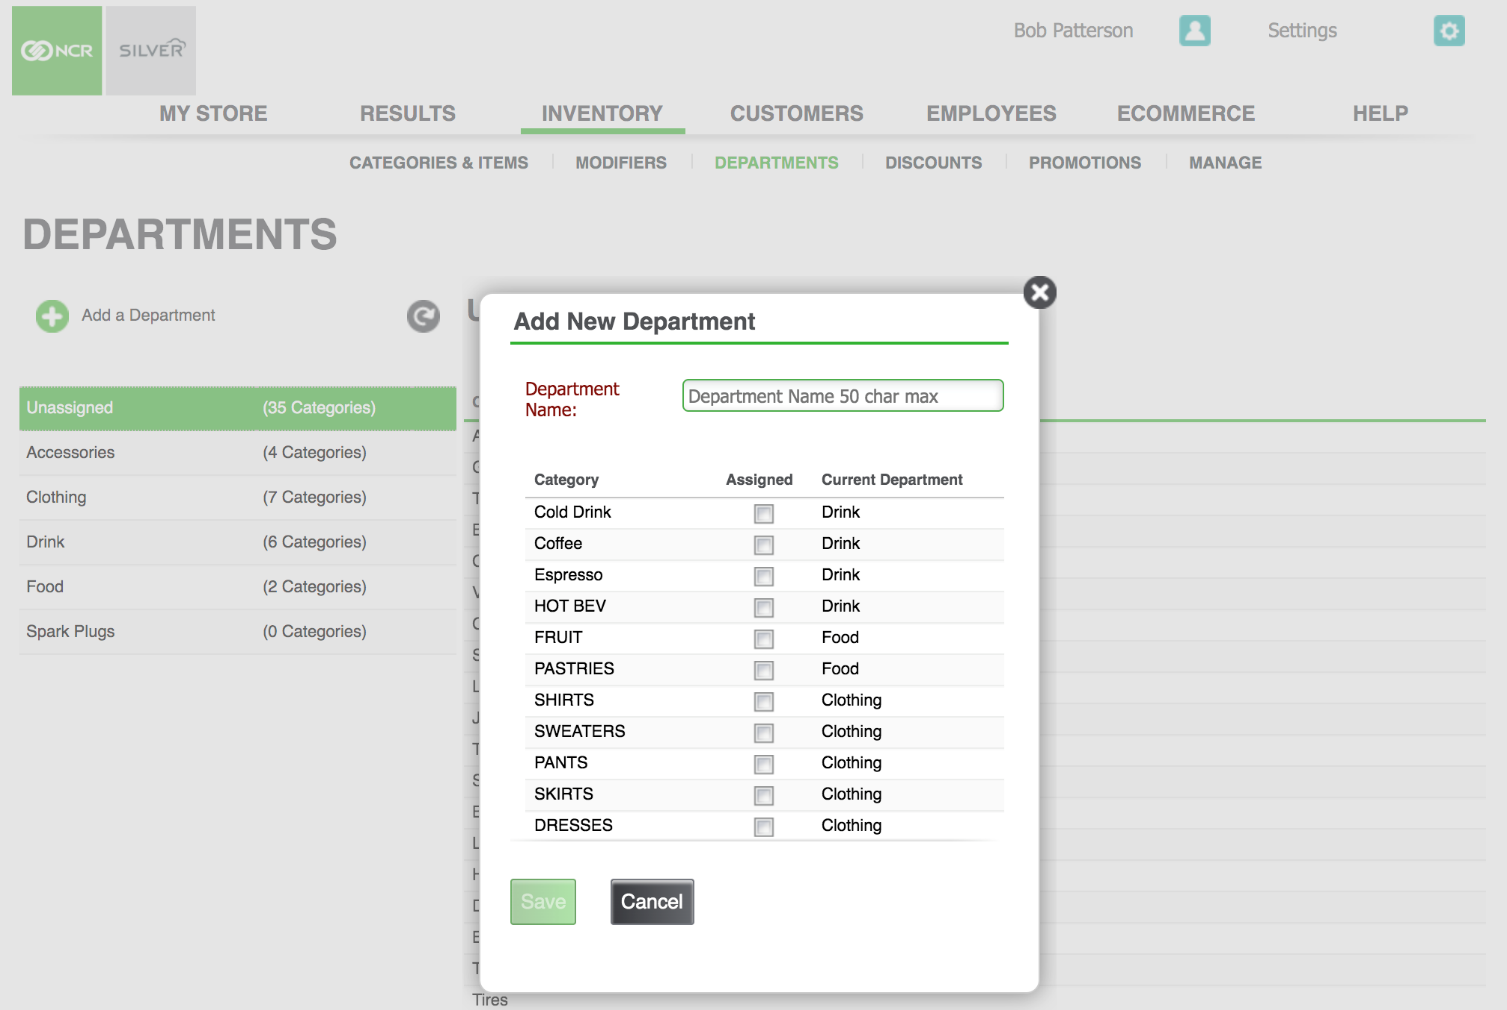
To edit or delete a Department:
To edit the Department assigned to a category:
1. Click on the pencil icon next to the affected Category.

2. Click on the drop-down menu next to Department to assign a different department.

Items
Now that you have created categories, you will want to create an item record for each item you sell. For each item you enter, you must specify a category, item name, price, and tax category (the system will pre-select your default tax category, but you can change to another tax category, as needed).
You can search your items by bar code. You also need to indicate how you sell the item -- by unit or weight/measure. In addition, you can add the vendor who supplied you the specific item and your cost for the item. This feature will make reordering simpler and provide visibility into profitability when items are sold.
The POS app makes it very intuitive for you to track your inventory. By allowing you to define up to three variations for any item, you can track all of the possible combinations of these characteristics under a single item. Variations are usually grouped together into variation groups.
In addition, you can also set up item modifiers to make it easy for employees to select options and extras when selling an item at the POS app. You will group modifiers into modifier groups.
Clink the links below to learn how to:
Once you have created your categories and items in the Back Office, you may want to change the order they are displayed both in the Back Office and on your POS device(s). Non-multi-store customers can do this from the Back Office, as well as from the POS device. Multi-store customers can only edit the sort order in the Back Office. To do this in the Back Office: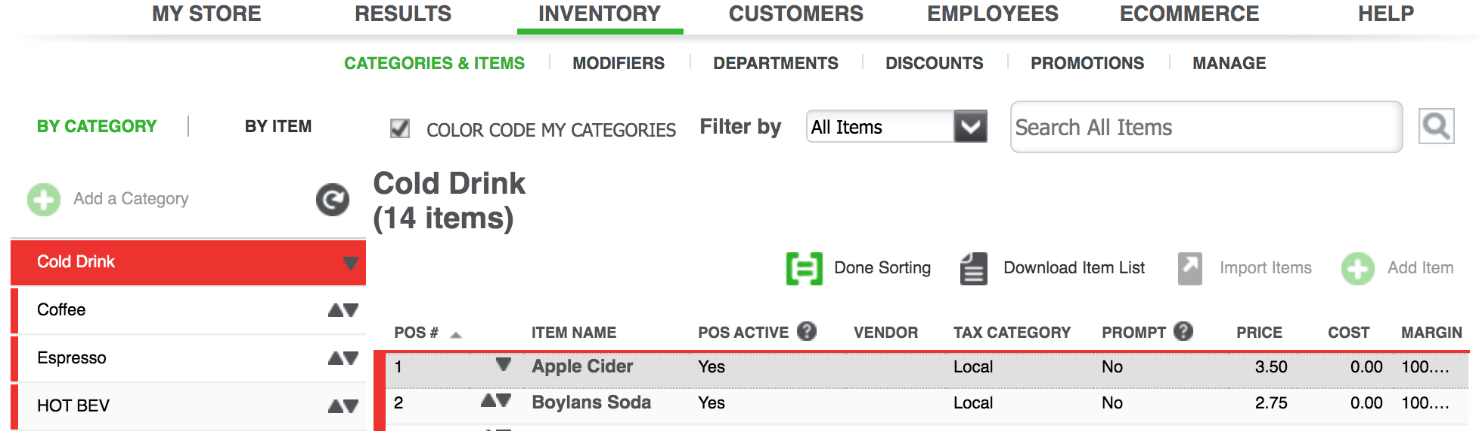
By grouping your merchandise into categories, you can put similar inventory items together. For example, if you sell sporting goods, you might define a category for each sport, such as golf, tennis, basketball, etc. If you own a book store, you can group items by type, such as hard cover, soft cover, large print, etc.
Grouping items into categories will also make finding items in the POS app much easier for your employees. Also, the reports in the Back Office use item categories to consolidate key sales information. For example, you can track profits by how well each category is selling.
If you are having trouble deciding what categories to use, start by creating very broad categories. You can always change them or add more specific categories later.
In this article, you will learn how to:
- Add a new category
- Edit or remove a category
- Sort categories & items
Add a Category
Multi-store customer? You need to be in Company View to add and edit your items and categories.
NOTE: The Color Code My Categories checkbox is selected by default, but you can uncheck this option if you prefer to not color code your categories.
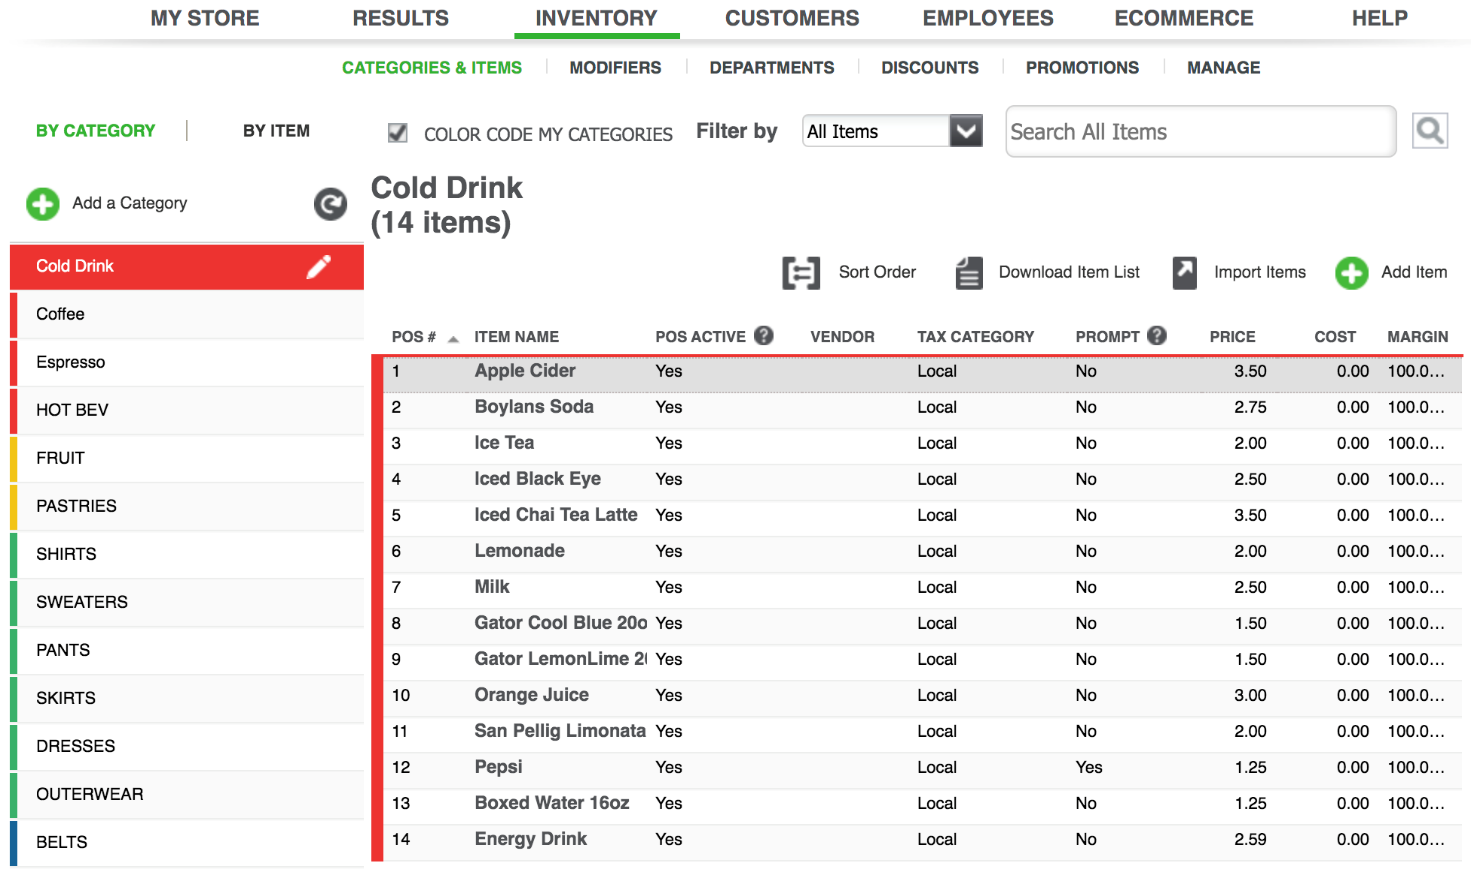
- Select Inventory and then Categories & Items.
- Select Add A Category to create a new item category.
- Enter a brief Category Name of up to 20 characters for the category and click the Save button.
- You can also choose to add a color to that category and its items by clicking the Color Code My Categories checkbox or by selecting a color when you create a category. The screen will then show how the colored button will appear in the POS app. If you do not want categories and items to be color-coded in the POS app, you can select No Color.
- Click the Save button to save the new item category.
- Repeat these steps for each type of merchandise you sell. You will be able to re-arrange the order of your categories from the POS app.
Edit or Remove a Category
NOTE: Removing a category is a "soft delete". This means that although the category is removed from your view, all the data and activity associated with that category is still shown in reports, transactions, etc..
If you want to edit or remove a category:
- Select Inventory and then Categories & Items.
- Scroll through the list of your categories and click the pencil icon to edit the category's name and/or color.
- If the category does not have any items in it, you can delete the category. Click Delete to delete the category. The system will display an alert to let you confirm removing the category:
- Click Yes to remove the category . If the selected category has any sales activity, the system will let you know, so that you can determine if you still want to remove the category.
- Click No to keep the category.
The Department section currently has five default Departments. To add a new Department:
- Select Inventory and then Departments.
- Click on the Add Department button.
- Here you can create a new department AND assign categories to it.
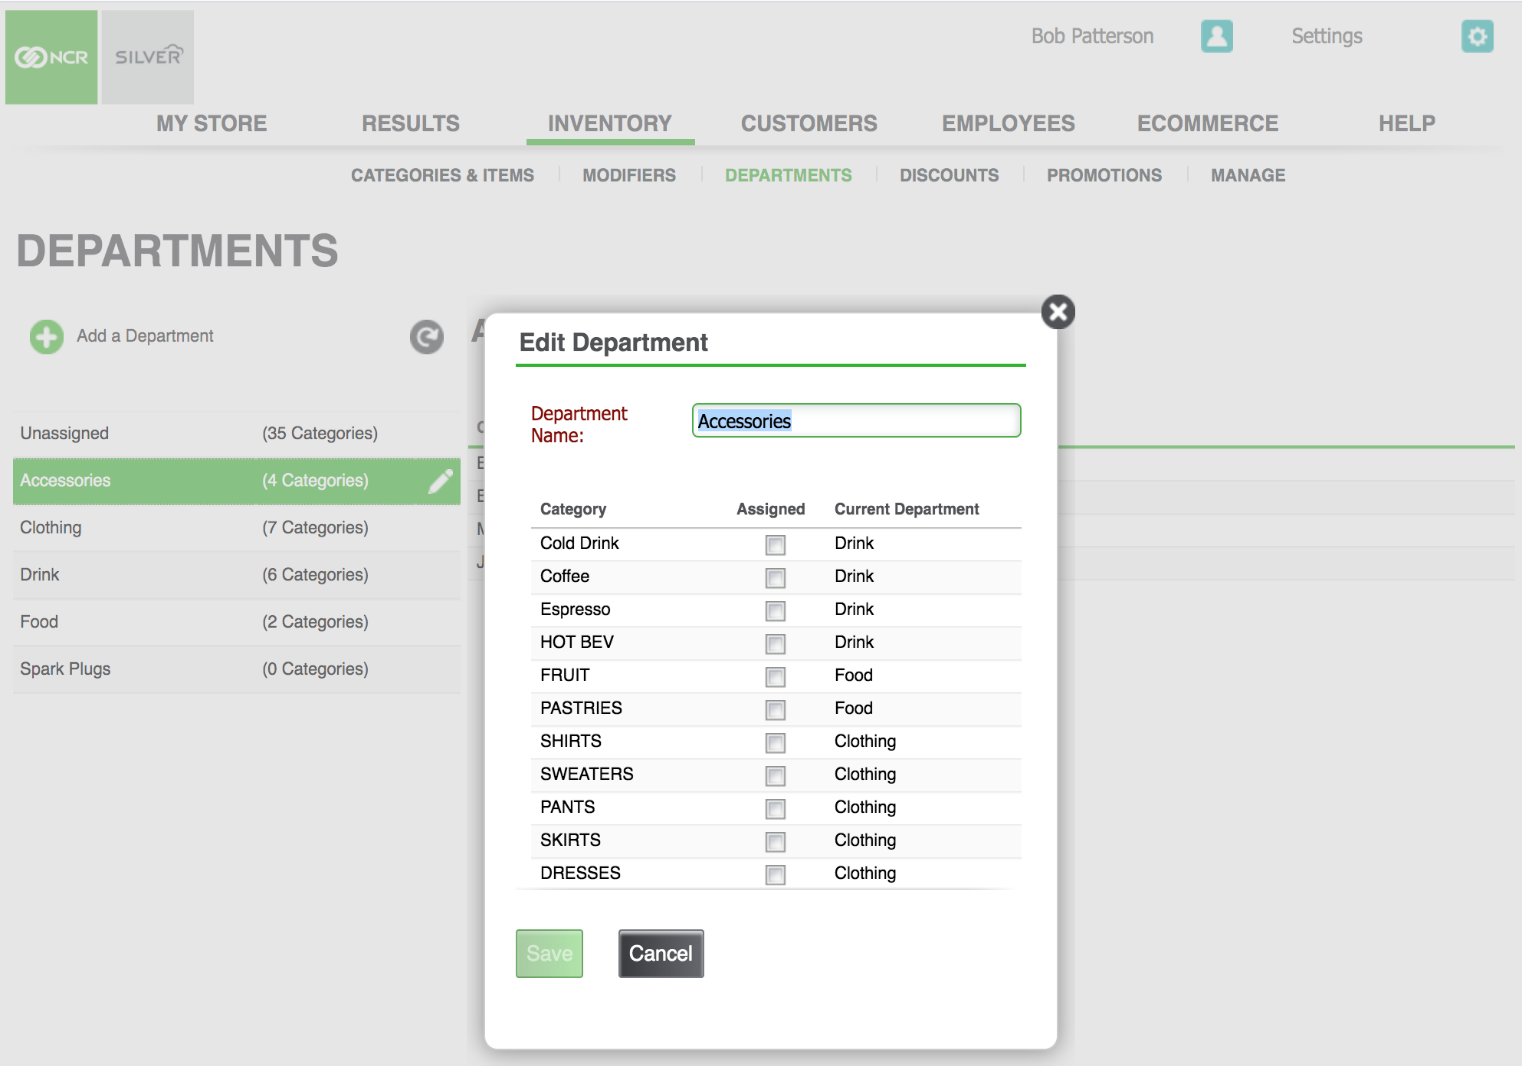
To edit or delete a Department:
- Click on the pencil icon next to the affected Department.
- Rename, edit or delete the Department.
To edit the Department assigned to a category:
1. Click on the pencil icon next to the affected Category.
2. Click on the drop-down menu next to Department to assign a different department.
Items
Now that you have created categories, you will want to create an item record for each item you sell. For each item you enter, you must specify a category, item name, price, and tax category (the system will pre-select your default tax category, but you can change to another tax category, as needed).
You can search your items by bar code. You also need to indicate how you sell the item -- by unit or weight/measure. In addition, you can add the vendor who supplied you the specific item and your cost for the item. This feature will make reordering simpler and provide visibility into profitability when items are sold.
The POS app makes it very intuitive for you to track your inventory. By allowing you to define up to three variations for any item, you can track all of the possible combinations of these characteristics under a single item. Variations are usually grouped together into variation groups.
In addition, you can also set up item modifiers to make it easy for employees to select options and extras when selling an item at the POS app. You will group modifiers into modifier groups.
Clink the links below to learn how to:
- Create a new item
- Edit or remove an item
- Filter modifier groups for an item
- Import items
- Unassigning Items from Stores - Multi-Store Customers Only
Once you have created your categories and items in the Back Office, you may want to change the order they are displayed both in the Back Office and on your POS device(s). Non-multi-store customers can do this from the Back Office, as well as from the POS device. Multi-store customers can only edit the sort order in the Back Office. To do this in the Back Office:
- Select Inventory and then Categories & Items.
- Click the Sort Order button as shown below. This will put you in the "sort order" mode. While in this mode, you can sort the order of your categories and the items within the categories. Note: You cannot add a new item, edit an item or import items while in this mode.
- Click the sort order up and down buttons
to change the order of your categories and items. When you click the
buttons for a category or item, the system will dynamically update the order on the screen. You do not have to save each time you move a category/item. For items, you can also drag and drop to change their sort order.
- When you have everything sorted to your liking, click done sorting to exit the sort order mode. Any changes you made in the Back Office will be pushed down to your POS device(s).