Questions?
Contact us at support line.
US: 877-270-3475
or
Log in to back office to chat with a representative
Contact us at support line.
US: 877-270-3475
or
Log in to back office to chat with a representative
Visit NCR.com/Silver
Browse by categories
NCR Console - How to Add Inventory
December 5, 2016
Description
The NCR Console Inventory management module makes it easy to track the details of incoming inventory. The detail allows you to make more informed decisions when managing costs, tracking inventory and receiving new ingredient or item deliveries.
To add inventory:
- Log into NCR Console, go to the Store tab, click Product
- Click Inventory
- Click Add Inventory
- Click the calendar icon to the right of As of to select the date and enter the time of the delivery
- It’s important the date you enter reflects the date that you actually received the delivery of ingredients/goods (even if it is not the date that you are adding inventory to the system)
- Inventory should always be entered in the sequence of events it occurred
- Enter quantity of all items received
- Select the unit size of each item received
- Adjust the unit cost for each item received
- The unit cost should always reflect the unit size that is shown
- For example, if one case containing 100 gadgets costs $100, each gadget costs $1. The unit size for a case should be Case and the Unit Cost should be $100. However, if you change the unit size to Each the unit cost should be changed to $1 so that the totals correctly calculate costs. See additional details in the below reminder.
6. Click next
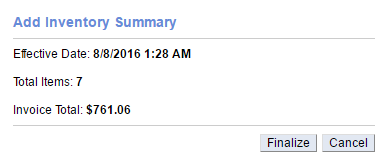
7. A summary of your add will be reflected in a floating window
8. Click Finalize