Questions?
Contact us at support line.
US: 877-270-3475
or
Log in to back office to chat with a representative
Contact us at support line.
US: 877-270-3475
or
Log in to back office to chat with a representative
Visit NCR.com/Silver
Browse by categories
Access the settings menu from the Back Office to configure your company information and settings.
Company Information
Back Office pre-populates the company information with the information entered when your account was created.
-
Select Settings > Company Information.
.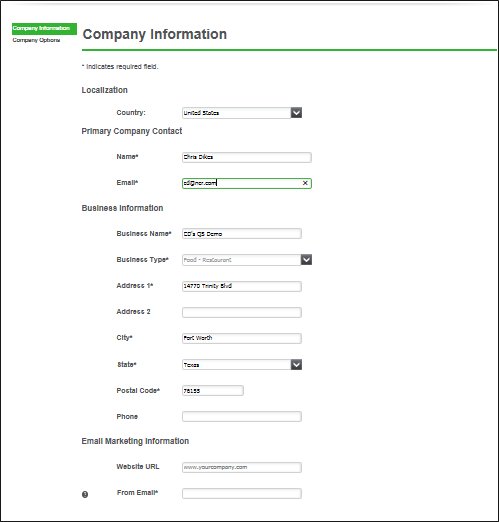
- Review and edit the Country of operation to change Localization settings such as currency indicators, address and date/time formats.
- Review and edit the name, phone number, and email address for the primary contact person for your company, if necessary.
- Review and edit the business name, if necessary.
- Type the Web site URL for your company. The system displays the Web site URL on receipts you print and email.
- Type the email address to use for email marketing. The system displays this email address as the ‘From’ email address in any email marketing messages.
- Click Save.
Company Options
Company options are all optional to meet your business needs.- Click Company Options on the left side of the screen.
- Select Enable Drawer Checkout (by user role). Drawer checkout enables you to assign multiple users to the same cash drawer and to have your employees enter a starting and ending bank amount. If you do not plan to use Drawer Checkout, leave this option blank.
- If you enable Drawer Checkout, you must also access EMPLOYEES > USER ROLES and update your user role settings to enable a user role for drawer checkout.
- Type the maximum number of users per cash drawer.
- Click Ask for starting bank to require the POS to prompt employees to enter a starting bank amount.
- Click Ask for ending bank to require the POS to prompt employees to enter an ending bank amount.
- Click Allow Multiple Drawer Shifts to allow cashiers to open drawer shifts on multiple cash drawers. This allows them to complete transactions from multiple devices, on multiple drawers.
- Select Print non-priced modifiers on guest check to have non-priced modifiers not appear on customer receipts. They will only appear on kitchen chits.
- Click Save.