Questions?
Contact us at support line.
US: 877-270-3475
or
Log in to back office to chat with a representative
Contact us at support line.
US: 877-270-3475
or
Log in to back office to chat with a representative
Visit NCR.com/Silver
Browse by categories
Charges allow you to add non-sales revenue items to an order, such as a delivery charge, membership fee, bottle deposit, or another miscellaneous fee. You can manually add charges to a guest check, or you can assign a charge to an order mode, such as takeout or delivery, which will cause the system to automatically add the charge every time you select the order mode. A Charges button appears on the payment screen to enable you to manually add a charge to a guest check.
NCR Silver Pro Restaurant reports charges on the Store Summary report as a separate line item and outside of the net sales calculation.
With charges, NCR Silver Pro Restaurant adds two new access levels. One, ‘Charges,’ controls which users can access the Charges page in Silver Back Office, and the other, ‘Add Charge to a Ticket,’ controls which users can manually add a charge to a guest check. Review your user roles to ensure the appropriate access levels are assigned.
Regarding charges:
Once you configure your charges, you can assign a charge to an order mode so the charge applies automatically when the order mode is applied.
For multi-site operations, you configure charges at the company level. You cannot create or edit charges at the store level.
You can add, edit, deactivate, and delete a charge.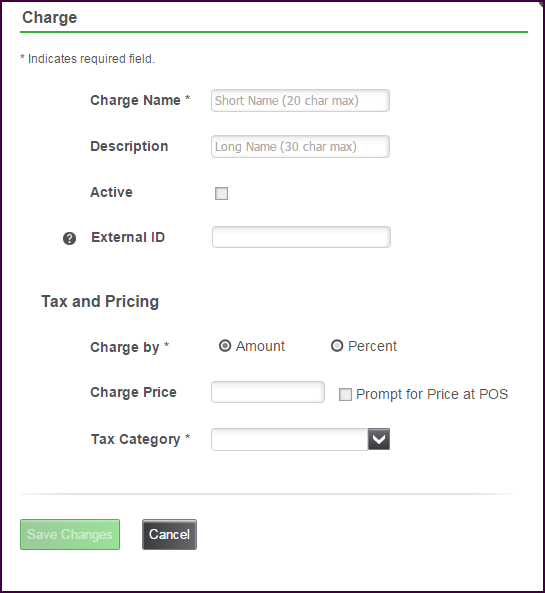
The system allows you to deactivate a charge, even if it is assigned to an order mode.
The system will allow you to delete a charge, even if it is assigned to an order mode.
After creating a charge, you can assign a charge to an order mode. When you do so, the POS automatically assigns the charge to the guest check when the order mode is selected.
To assign a charge to an order mode:
In some cases, you may decide to no longer automatically apply a charge to an order mode. You can remove the charge from the order mode.
See also:
Using Charges
NCR Silver Pro Restaurant reports charges on the Store Summary report as a separate line item and outside of the net sales calculation.
With charges, NCR Silver Pro Restaurant adds two new access levels. One, ‘Charges,’ controls which users can access the Charges page in Silver Back Office, and the other, ‘Add Charge to a Ticket,’ controls which users can manually add a charge to a guest check. Review your user roles to ensure the appropriate access levels are assigned.
Regarding charges:
- You can price charges in one of three ways: a defined flat amount, a prompt for price, or as a percentage of the ticket subtotal.
- Charges appear as a line item on the guest check.
- You must assign a tax category to a charge.
- You can deactivate a charge without deleting it.
- You can add manually add a charge to a guest check and adjust the quantity of the charge. For example, if you require a bottle deposit on growlers and a customer orders three, you can add the bottle deposit charge and increase the quantity to ‘3.’
- Upon adding a charge to a ticket, the system considers the charge finalized. If you remove a charge, the system considers the action a void. If the removed charge was percentage based, the voided amount reflects the charge at the time of the void.
- When multiple charges appear on a guest check, the system ignores the other charges when calculating a percentage based charge.
- You can apply an item level discount to a charge, but you cannot apply a ticket level discount to a charge.
- You can identify a charge as ‘House Account,’ which allows the charge to be used for house account payments at the POS.
Configuring Charges
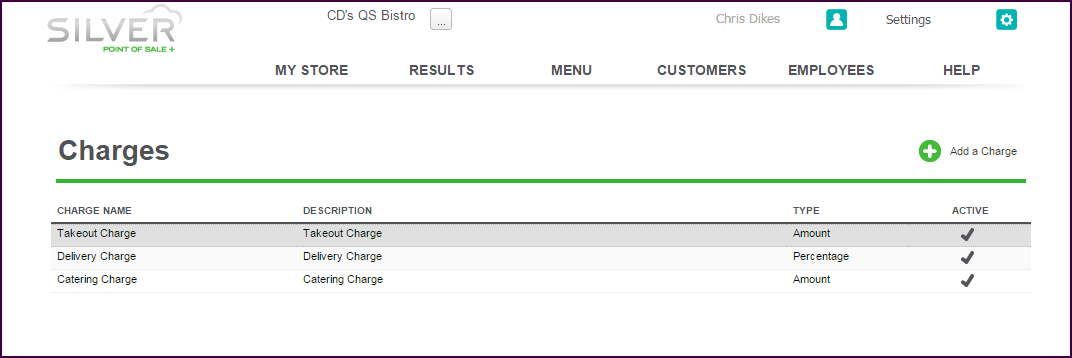
You configure charges in Silver Back Office. A checkmark underneath the active column indicates whether the charge is active or not.Once you configure your charges, you can assign a charge to an order mode so the charge applies automatically when the order mode is applied.
For multi-site operations, you configure charges at the company level. You cannot create or edit charges at the store level.
Managing Charges
You can add, edit, deactivate, and delete a charge.
To add a charge:
- In Silver Back Office, select Settings > Charges. The Charges screen appears.
- Click Add a Charge. A Charge popup appears.
- Type a name for the charge.
- (Optional) Type a description for the charge.
- Select Active to activate the charge.
- (Optional) Type an External ID number for the charge. If you leave External ID blank, the system automatically assigns an External ID to the charge after you save the record.
- (Optional) Select House Account to enable the charge to be used for house account payments at the POS.
- Under ‘Tax and Pricing,’ select the method by which to assess the charge, either amount or percentage.
- If you select Amount:
- For a flat amount charge, type the dollar amount for the charge.
- For a prompt for price charge, meaning a popup will appear on the POS and you will enter the amount of the charge, leave the charge price blank and select prompt for price.
- If you select Percent:
- Enter the charge percentage to use.
- (Optional) Enter the minimum price for the charge. For example, you enter the minimum price as $2.00 and the charge percentage as 10%. If a guest check subtotal is $5.00, rather than the charge being .50, it will be $2.00, which is the minimum amount.
- (Optional) Enter the maximum amount for the charge. For example, you enter the maximum price as $10.00 and the charge percentage as 10%. If a guest check subtotal is $500.00, rather than the charge being $50.00, it will be $10.00, which is the maximum amount.
- (Optional) Enter the closest amount for which to round the charge amount. For example, the rounded amount is .10. If the charge amount is $1.07, the system will round the charge to the nearest .10. In this example, the charge will be $1.108. Select the tax category from the drop-down list.
- (Optional) Configure percentages to the second decimal place. For example, 2.5% can now be 2.75%.
- Click Save.
- In Silver Back Office, select Settings > Charges.
- Select the charge you want to edit. The Edit Charge screen appears.
- Make the necessary edits.
- Click Save Changes.
The system allows you to deactivate a charge, even if it is assigned to an order mode.
- In Silver Back Office, select Settings > Charges.
- Select the charge you want to deactivate. The Edit Charge screen appears.
- Clear the Active selection.
- Click Save Changes.
The system will allow you to delete a charge, even if it is assigned to an order mode.
- In Silver Back Office, select Settings > Charges.
- Select the charge you want to delete. The Edit Charge screen appears.
- Select Delete Charge. A prompt appears.
- Click OK.
Assigning a Charge to an Order Mode
After creating a charge, you can assign a charge to an order mode. When you do so, the POS automatically assigns the charge to the guest check when the order mode is selected.
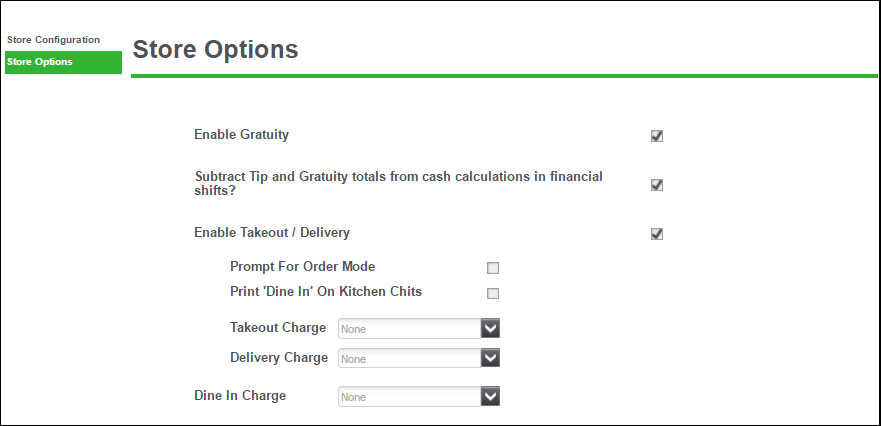
- In Silver Back Office, select Settings > Store > Store Options.
- Under ‘Enable Takeout/Delivery,’ select the takeout charge from the drop-down list.
- Select the delivery charge from the drop-down list.
- Select the dine in charge from the drop-down list.
- Click Save.
In some cases, you may decide to no longer automatically apply a charge to an order mode. You can remove the charge from the order mode.
- In Silver Back Office, select Settings > Store > Store Options.
- Under ‘Enable Takeout/Delivery,’ select none from the drop-down list of the order mode charge you want to remove.
- Click Save.
See also:
Using Charges