Troubleshooting the Countertop Receipt Printer Model 350
|

|
IMPORTANT: Only one printer can be powered on at a time during setup. Also, due to the nature of Bluetooth, multiple Bluetooth printers can be connected to one device, but multiple devices cannot be connected to the same Bluetooth printer.
|
We're sorry you are having trouble with your countertop receipt printer. Let's walk through each of these procedures to troubleshoot the source of the problem:
Step 1: Check the Basics First
Step 2: Advanced Troubleshooting
Step 1: Check the Basics First
Check to see if the .
Follow the instructions for whether your countertop receipt printer is set up with a Bluetooth or wired connection.
Bluetooth Connection
If you are having problems printing to the Model 350 receipt printer:
-
On the POS app device, go to the “home” screen by clicking the Home button, then tap the Settings app, and then tap Bluetooth.
-
Make sure the Bluetooth is set to On.
-
Look for the printer (SRP-350IIOBE ) and verify that it shows as Connected. If it shows as Not Connected, tap the device name to connect.
If this didn't solve the problem, try this next:
-
Ensure all other POS app printers are off.
-
On the POS app device, go to the “home” screen by clicking the Home button, then tap the Settings app, and then tap Bluetooth.
-
Look for the printer (SRP-350IIOBE ) and tap  and then tap Forget this Device.
-
Log in to the POS app, tap the  icon and tap Configure printers.
-
Swipe the printer's name and tap Delete.
-
On the POS device, go to the “home” screen by clicking the Home button, then tap the Settings app, and then tap Bluetooth.
-
Look for the printer (SRP-350IIOBE ) and tap it. Enter the PIN (0000) and tap Pair to pair the printer to the POS device.
-
Log in to the POS app, tap the  icon and then tap Configure printers.
-
Tap Find new printer and tap Bluetooth.
If this didn't solve the problem, please contact Customer Care.
Wired Connection
-
Check to see if you can turn the printer on.
-
Ensure the Ethernet cord is correctly plugged in to your router and the printer.
-
Ensure the Ethernet lights on the back of the printer and on the router are on.
Step 2: Advanced Troubleshooting - Performing a Hex Dump (For Wired Connection Only)
If you have completed the basic troubleshooting, and you still cannot print receipts, use this procedure to perform a hex dump for the printer. This is a little more complicated than the basic troubleshooting, so please call Customer Care if you want guided assistance on completing this process.
We need to compare your printer's IP address to the IP address on your iOS device to make sure they match. To do this:
-
Turn the printer off.
-
Press and hold the FEED button while turning the printer back on until it stops beeping. Wait a few seconds until the printer prints the first printer status receipt.
-
Press the FEED button again after it stops printing. A second receipt will print (you can discard this one).
-
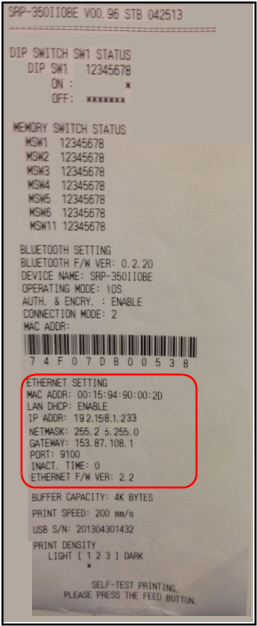
Wait for the printer to print a printer status receipt (also known as hex dump).
-
Look for the line that begins with IP ADDR under the ETHERNET SETTING section.
-
Log in to the POS app.
-
Go to the Home screen.
-
Tap Settings > Configure printers. Your printer's IP address will be displayed under your printer's name.
-
Check to see if the numbers match. If they match, continue with step 10; otherwise, skip to step 11.
-
Tap  for the printer and then tap Print test receipt. If it printed, you are done.
-
Tap Find new printer, choose your printer's connection method (Wired directly to router). When the system prompts you for the IP address, enter the address from the printer status receipt you previously printed.
If you are still having issues printing, please call Customer Care.
