Questions?
Contact us at support line.
US: 877-270-3475
or
Log in to back office to chat with a representative
Contact us at support line.
US: 877-270-3475
or
Log in to back office to chat with a representative
Visit NCR.com/Silver
Browse by categories
Setting Up Store Options
Use Store Option in your Back Office to enable what appears on the POS device at your store location. To access store option settings: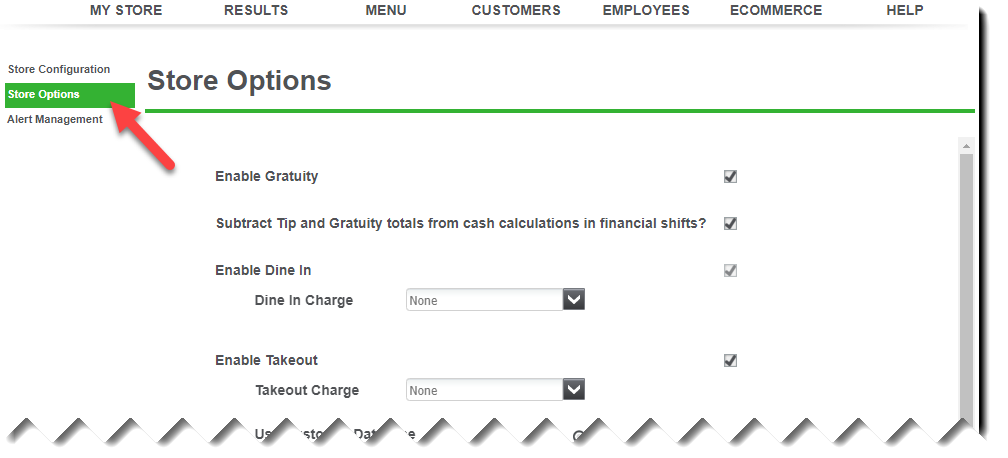
Use Store Option in your Back Office to enable what appears on the POS device at your store location. To access store option settings:
- Select Settings > Store.
- Click Store Options from the on the left side of the screen.
- Select Enable Gratuity to allow customers to provide non-cash tips. It is necessary to define a gratuity tax under Settings > Taxes, if you are \subject to gratuity tax.
- Select Subtract Tip and Gratuity totals from cash calculations in financial shifts to have the system remove employee tips and gratuities earned from the total cash owed amount at the end of a shift. By default, the system enables this feature.
- Select Enable Dine In to enable dine in orders.
- (Optional) Select a Dine in Charge to add charges to dine in orders, for example a license tax.
- Select Enable Takeout to enable takeout orders
- (Optional) Select a Takeout Charge from the drop-down list (if applicable).
- Select either Use Customer Database or Use Simple Order Name to choose the method to add a name to a takeout order.
- Select Enable Delivery to enable delivery orders
- (Optional) Select a Takeout Charge from the drop-down list (if applicable).
- Select either Use Customer Database or Use Simple Order Name to choose the method to add a name to a delivery order.
- Select Enable Catering to enable catering orders
- (Optional) Select a Takeout Charge from the drop-down list (if applicable).
- Select either Use Customer Database or Use Simple Order Name to choose the method to add a name to a delivery order.
- Select Enable Drive Thru to enable drive thru orders
- (Optional) Select a Drive Thru Charge to add charges to drive thru orders, if applicable.
- Select Enable Breaks to add the option for employees to take non-paid breaks during their shift. When an employee logs in to the POS and clocks in, a Start Break icon is added to the POS home screen.
- Type the minimum amount of minutes to enforce for breaks, which is the required amount of time an employee must remain on break. If an employee wishes to return to break early, a supervisor’s approval is required.
- Select Online Ordering to configure online ordering.
- (Optional) Select Automatically close pre-paid orders for online orders. When you select this feature, fully paid online orders will not appear in the Takeout/Delivery queue and will not require you to close the order. Rather, as soon as the POS receives the order, a customer receipt prints and the order is closed. Note: This feature does not appear until you receive at least one online order.
- (Optional) Enter a takeout download threshold time (in minutes) for online orders designated as takeout to print a kitchen chit. By default, the POS prints a kitchen chit to the defined kitchen printers 30 minutes prior to the order target time.
- (Optional) Enter a delivery download threshold time (in minutes) for online orders designated as delivery to print a kitchen chit. By default, the POS prints a kitchen chit to the defined kitchen printers 60 minutes prior to the order target time.
- Guest Count Method - Select how guests are counted. Options are:
- By Seat
- By Item
- By Prompt
- Click Save.