Questions?
Contact us at support line.
US: 877-270-3475
or
Log in to back office to chat with a representative
Contact us at support line.
US: 877-270-3475
or
Log in to back office to chat with a representative
Visit NCR.com/Silver
Browse by categories
You can create a number of different promotions. This section includes a general overview of the options for configuring a promotion including:
Refer to Examples of Configuring Promotions for specific examples of configuring promotions.
For multi-site operations, additional rules apply when sorting promotions. At the company level, you can sort all promotions. At the store level, you can only sort promotions created at the store level.
About Promotions
Examples of Configuring Promotions
Using Promotions
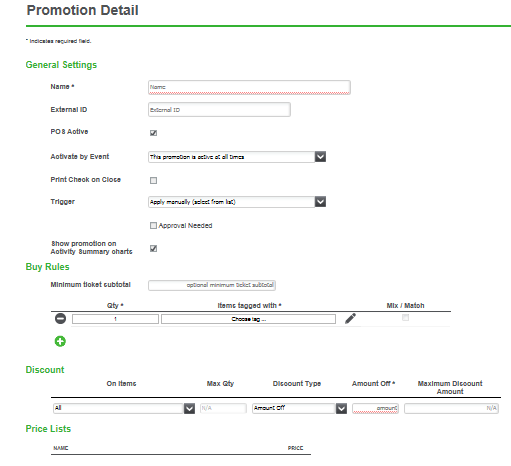
Adding a Promotion
- In Back Office, select MENU > PROMOTIONS.
- Click Add a Promotion.
- Under ‘General Settings,’ type a name for the promotion. The name will appear on the guest check screen when you apply the promotion.
- (Optional) Type an external ID for the promotion. You can leave this field blank and the system will automatically assign an external ID to the promotion when you save the record.
- (Optional-Single Site merchants only) Clear Available to disable the promotion. By default, Back Office enables promotions.
- (Multi-Sites only) At the company level, click Assign to assign the promotion to stores.
- (Optional) Select an event from the drop-down list to activate the promotion. Leave the field blank to make the promotion active at all times.
- (Optional) Select Print check on close to print a duplicate receipt when you close the check.
- Select a trigger for the promotion from the drop-down box. The available options are:
- Apply manually (select from list) to require employees to select the promotion from a list on the POS. Only the promotions that can apply to the guest check appear for an employee to select.
- Detect automatically to have the system automatically apply the promotion when the guest check meets the requirements of the promotion.
- Scan barcode to require employees to scan a barcode to apply the promotion. When selecting scan barcode, it is necessary to configure the barcode range. The following apply to the barcode range:
- The barcode range must involve at least 1 alphanumeric character and no more than 20.
- The length of the start and end of the barcode strings must be the same.
- The barcode end range must be the same or greater than the barcode start range.
- The barcode ranges do not need to be unique across promotions.
- (Optional) Select Approval needed for a manager to authorize the promotion on the POS. This option is only available when you select ‘Apply manually’ or ‘Scan barcode’ as the promotion trigger.
- (Optional) Clear Show the discount on Activity Summary charts to not have the discount calculated as part of the totals on the Activity Summary page. For example, you may not want to have Employee Discounts appear as part of the Discounts and Promotions calculation on the Activity Summary page to give you a more accurate reflection of the effectiveness of your discounts and promotions.
- (Optional) Under ‘Buy,’ enter the amount for the minimum ticket subtotal for the promotion to apply. You can leave this blank if you do not want to require a minimum.
- Define the first rule for the promotion:
- Update the quantity, if greater than ‘1.’
- Select the tag containing the items for the promotion.
- (Optional) Clear Mix/Match to require all items meeting the condition of the rule to be exactly the same. For example, in a sandwiches promotion, if Mix/Match is not enabled, both sandwiches must be the same, as in meatball sandwich. By default, Back Office enables Mix/Match, which allows different items with the same tag to be combined to meet the rule’s condition. For example, in a sandwiches promotion, if Mix/Match is enabled, one sandwich could be a meatball and another could be turkey. If the rule quantity is ‘1,’ then Mix/Match is not an available option.
- Click to add an additional rule for the promotion and repeat step 12. For some promotions, you may have multiple rules, particularly if you are creating a promotion with items from different tags.
- Under ‘Discount,’ select the rule for which the discount applies. The system defaults to ‘all.’
- When you select a specific rule for the discount, the discount only applies to that rule. For example, you have a BOGO promotion of buy one sandwich get one drink free. You would apply the discount to the rule containing the drink tag.
- Select the quantity for the discount. For example, if you are providing a BOGO coupon, the discount applies to ‘1’ item. If you are providing a ‘Buy 4 shots, get 2 half off,’ the discount applies to ‘2’ items.
- Select the discount type from the drop-down list. The options are:
- Percent Off to provide a discount in the form of a percentage, such as 50% off.
- Amount Off to provide a discount in the form of a dollar amount, such as $2.00 off.
- Set Amount to provide a discount as a set sales amount, such as $7.50. This causes the system to charge a set amount for the items.
- Type the amount for the discount.
- (Optional) Type the maximum discount amount. You can only enter a maximum discount amount for the promotion when using Percent Off. A maximum discount amount provides a limit you are willing to discount. For example, you create a promotion for 50% off and you add a maximum discount amount of $10. If the promotion items total $15, the discount is $7.50. If the promotion items total $30, the discount is $10 rather than $15, since $10 is the maximum dollar amount you want to discount.
- Click Save.
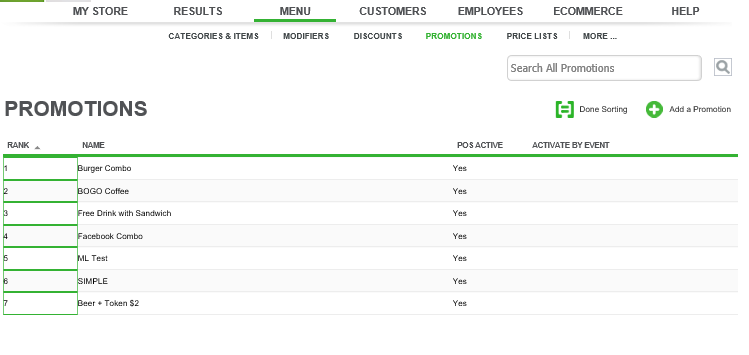
Sorting Promotions
After you create promotions, you can sort the order in which the POS seeks to apply them. The POS stops searching for promotions once it finds the first promotion that applies to the guest check.For multi-site operations, additional rules apply when sorting promotions. At the company level, you can sort all promotions. At the store level, you can only sort promotions created at the store level.
- In Back Office, select MENU > PROMOTIONS.
- Click Sort Order.
- Enter the rank in which you want to order the promotions, 1 being the first in line.
- Click Done Sorting.
Duplicate a Promotion
You can quickly duplicate existing promotions on the company and store level.
- Select MENU > PROMOTIONS
- Scroll through the list of your discounts and click on the row of the discount that you want to duplicate.
- Click the Duplicate button in the upper right hand corner
- The newly created promotion will have all the fields pre populated except for “Name” and “External ID”.
- Edit the details for the discount and click Save.
Editing a Promotion
You can edit an existing discount or remove a discount you no longer want to maintain. To do this:
- Select MENU > PROMOTION.
- Scroll through the list of your discounts and click on the row of the discount that you want to edit.
- Edit the details for the discount and click Save.
Deleting a Promotion
In some cases, you may wish to delete a promotion, which you can do in Back Office at the PROMOTIONS page. However, if you think you may use the promotion at some point in the future, you may want to deactivate the promotion rather than deleting it.- In Back Office, select MENU > PROMOTIONS.
- Select the promotion you want to delete.
- Click Remove promotion. A warning prompt appears.
- Click OK.
See also:
About PromotionsExamples of Configuring Promotions
Using Promotions