Questions?
Contact us at support line.
US: 877-270-3475
or
Log in to back office to chat with a representative
Contact us at support line.
US: 877-270-3475
or
Log in to back office to chat with a representative
Visit NCR.com/Silver
Browse by categories
The following contains five examples of the different types of promotions you can configure with NCR Silver Pro Restaurant. The following is not exhaustive of all the types of promotions you can create with NCR Silver Pro Restaurant.
Scenario 1:BOGO. You want to create a promotion where the purchase of one sandwich allows for one free drink. You also want the promotion to apply automatically and you limit the maximum discount amount to $2.00. Prior to creating the promotion, you create two tags, one for sandwiches and one for drinks.
The system processes the promotion as follows: When the guest check contains one item from each tag group, the system automatically discounts the item from the drinks tag by 100% up to $2.00.
Scenario 2: Happy Hour Special. You want to create a promotion where you sell 2 beers and the second beer is 50% off. You want the promotion to apply automatically during the Happy Hour event and the maximum discount amount is $5.00. Prior to creating the promotion, you create a Beer tag and a Happy Hour event.
The system processes the promotion as follows: When the guest check contains two items from the tag during the Happy Hour event, the system automatically applies a 50% discount to the lower priced item up to $5.00.
Scenario 3 Combo. You want to create a combo promotion where you sell one sandwich, one chips, and one soft drink for the set price of $7.50. You want the promotion to apply automatically. Prior to creating the promotion, you create three tags: one for sandwiches, one for chips, and one for drinks.
The system process the promotion as follows: When the guest check contains one item from each tag, the system automatically applies the defined set price.
Scenario 4: Coupon. You want to create a promotion for a free cookie with the purchase of a sandwich and the presentation of a coupon. The promotion will only be good for the month of April. Additionally, you want to cap the maximum discount amount at $2.50. Prior to creating the promotion, you create two tags, one for sandwiches and one for cookies. You also create an event for the promotion.
The system process the promotion as follows: The customer presents the coupon at the time of payment. The employee scans the coupon and the system confirms the guest check contains the necessary items for the promotion to apply. If it does, the system applies the discount to the cookie up to $2.50.
Scenario 5: Amount Off. You want to create a promotion for $3.00 off one hamburger when a customer purchases two hamburgers. You want the promotion to require the presentation of a coupon and have a manager authorize the discount. Additionally, the promotion is only to apply for the month of April. Prior to creating the promotion, you create one burger tag and an event for the promotion.
The system processes the promotion as follows: The customer presents the coupon at the time of payment. The employee scans the coupon and the system confirms the items are from the Burger tag. If the guest check meets the promotion requirements, the system prompts the employee for manager authorization to apply the discount.
See also:
About Promotions
Configuring Promotions
Using Promotions
Scenario 1:BOGO. You want to create a promotion where the purchase of one sandwich allows for one free drink. You also want the promotion to apply automatically and you limit the maximum discount amount to $2.00. Prior to creating the promotion, you create two tags, one for sandwiches and one for drinks.
The system processes the promotion as follows: When the guest check contains one item from each tag group, the system automatically discounts the item from the drinks tag by 100% up to $2.00.
- In Silver Back Office, select MENU > PROMOTIONS.
- Click Add a Promotion.
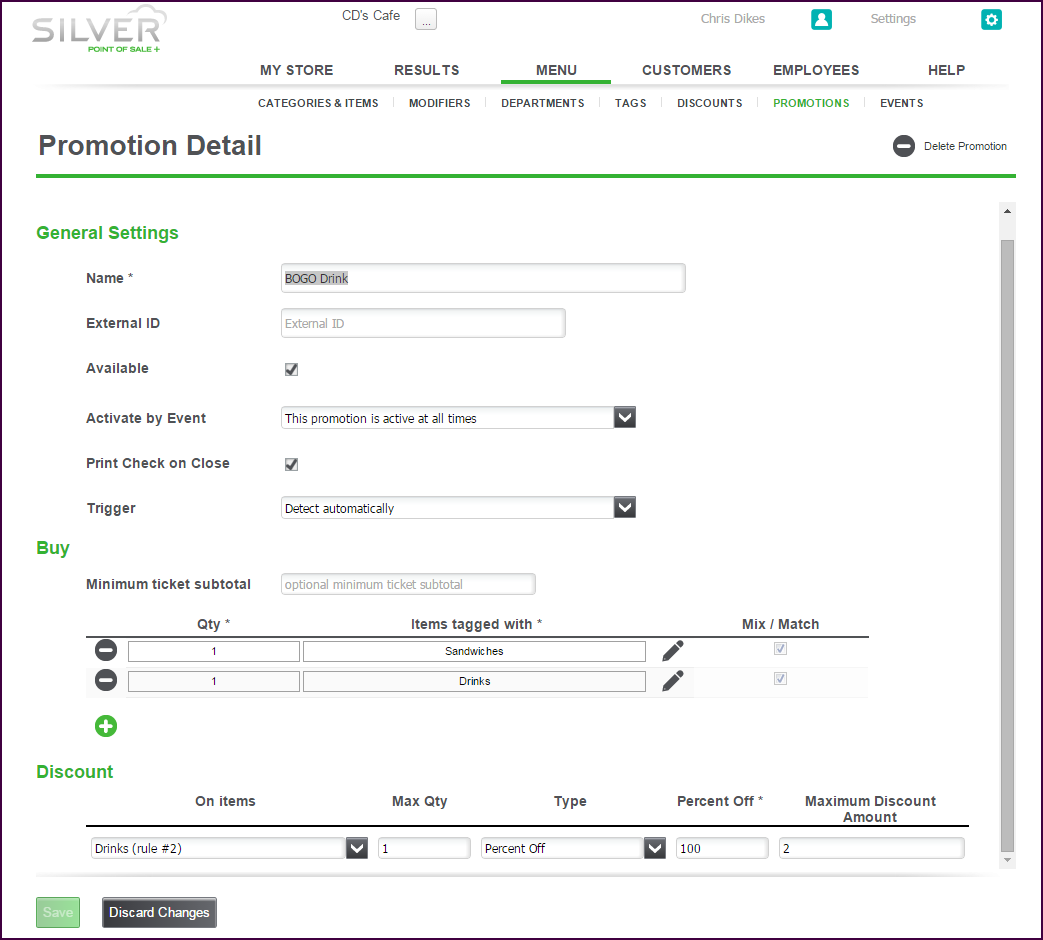
- Type a name for the promotion, such as ‘BOGO Drink.’’
- (Multi-Sites only) At the company level, click Assign to assign the promotion to stores.
- Leave the Event field blank to make the promotion active at all times.
- Select Print check on close to print a duplicate receipt when you close the check.
- Select Detect automatically as the event trigger.
- Under ‘Buy,’ for the first rule of the promotion, select the Sandwich tag.
- Click to add a second rule for the promotion and select the Drink tag.
- Under ‘Discount,’ select Drinks (rule#2) from the drop-down list.
- Type 1 for the quantity.
- Select Percent Off from the Type drop-down list.
- Type 100 for the percent off.
- Type $2.00 for the maximum discount amount. If the drink costs more than $2.00, the system will only provide a discount for $2.00.
- Click Save.
Scenario 2: Happy Hour Special. You want to create a promotion where you sell 2 beers and the second beer is 50% off. You want the promotion to apply automatically during the Happy Hour event and the maximum discount amount is $5.00. Prior to creating the promotion, you create a Beer tag and a Happy Hour event.
The system processes the promotion as follows: When the guest check contains two items from the tag during the Happy Hour event, the system automatically applies a 50% discount to the lower priced item up to $5.00.
- In Silver Back Office, select MENU > PROMOTIONS.
- Click Add a Promotion.
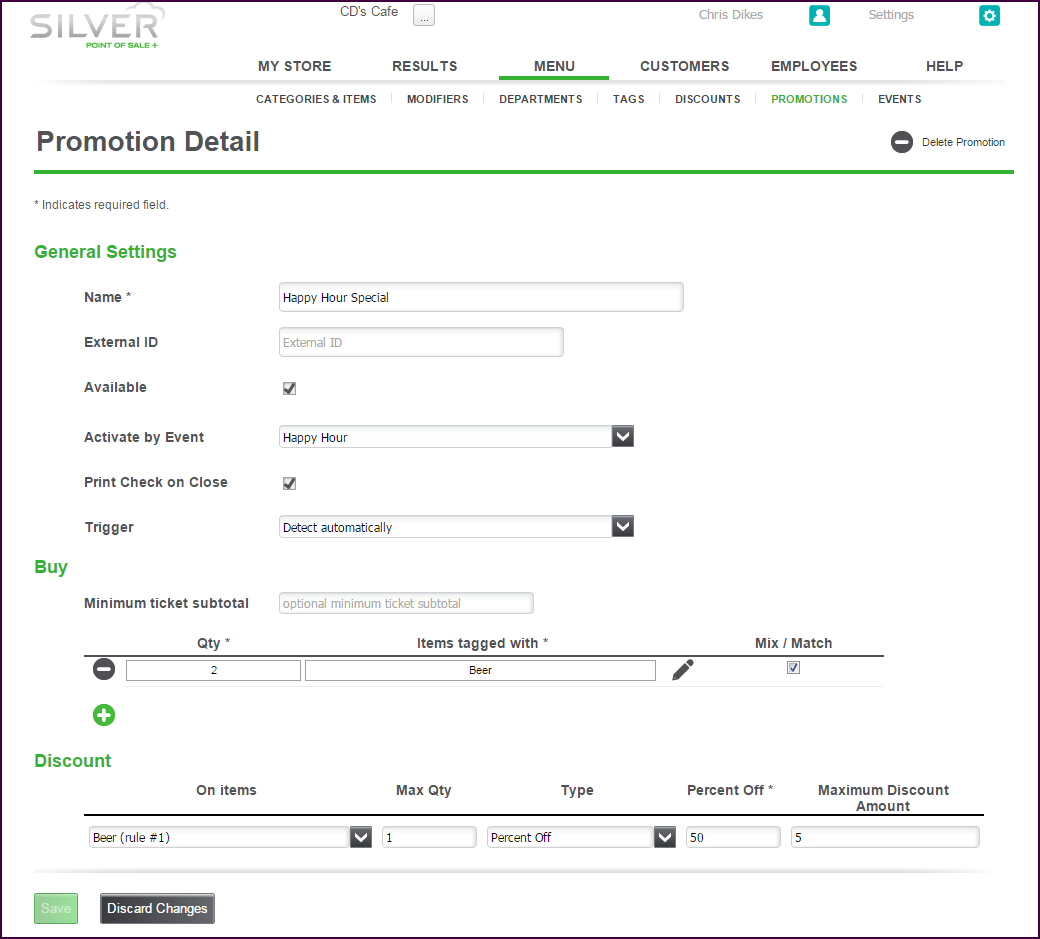
- Type a name for the promotion, such as ‘Happy Hour Beer Special.’’
- (Multi-Sites only) At the company level, click Assign to assign the promotion to stores.
- Select the Happy Hour event from the drop-down list.
- (Optional) Select Print check on close to print a duplicate receipt when you close the check.
- Select Detect automatically as the event trigger.
- Under ‘Buy,’ for the first rule of the promotion, type ‘2’ for the quantity and select the Beer tag.
- Under ‘Discount,’ select Beer (rule #1) for on items, as you only want to provide a discount on the second beer.
- Select Percent Off from the Type drop-down list.
- Type 50 for the percent off.
- Type 5 for the maximum discount amount.
- Click Save.
Scenario 3 Combo. You want to create a combo promotion where you sell one sandwich, one chips, and one soft drink for the set price of $7.50. You want the promotion to apply automatically. Prior to creating the promotion, you create three tags: one for sandwiches, one for chips, and one for drinks.
The system process the promotion as follows: When the guest check contains one item from each tag, the system automatically applies the defined set price.
- In Silver Back Office, select MENU > PROMOTIONS.
- Click Add a Promotion.
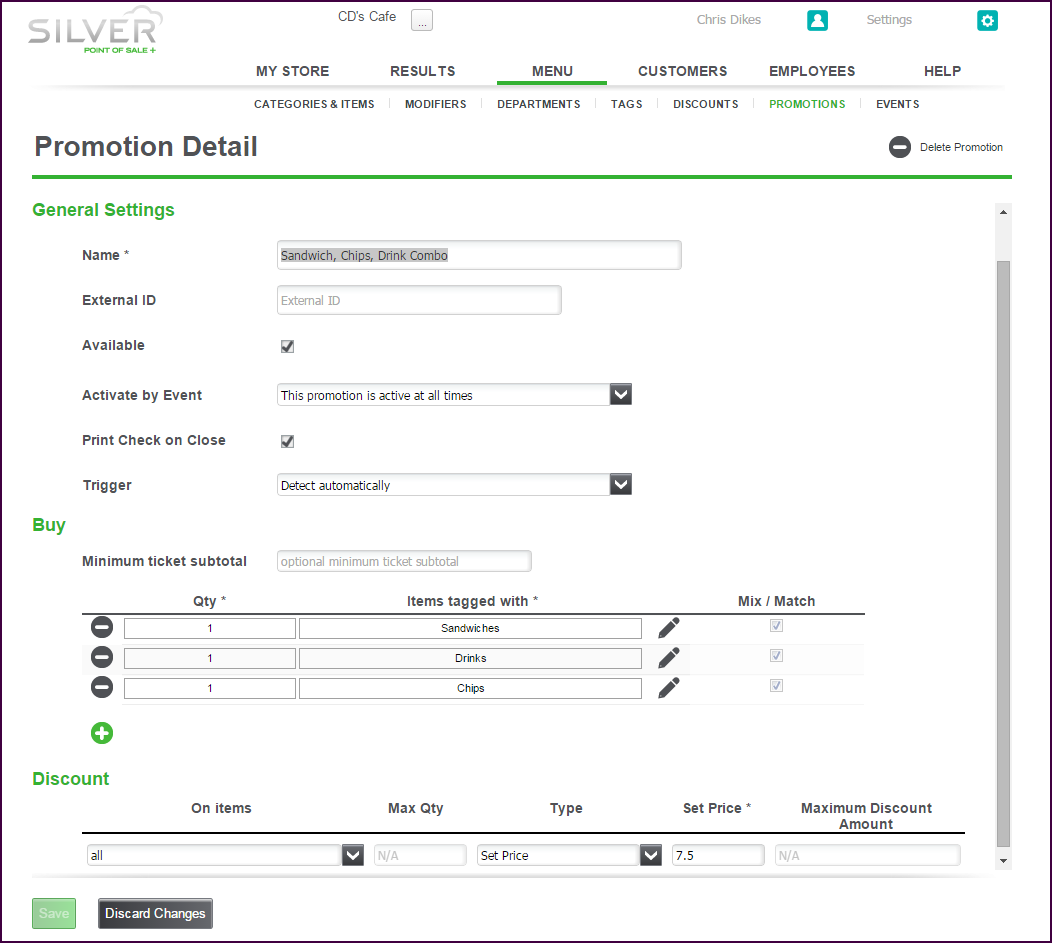
- Type a name for the promotion, such as ‘Sandwich, Chips, Drink combo.’’
- (Multi-Sites only) At the company level, click Assign to assign the promotion to stores.
- Leave the event field blank to make the promotion active at all times.
- (Optional) Select Print check on close to print a duplicate receipt when you close the check.
- Select Detect automatically as the event trigger.
- Under ‘Buy,’ for the first rule of the promotion, select the Sandwich tag.
- Click to create a second rule for the promotion and select the Chips tag.
- Click to create a third rule for the promotion and select the Drinks tag.
- Under ‘Discount,’ select All for on items.
- Select Set Price from the Type drop-down list.
- Type 7.50 for the set price amount.
- Click Save.
Scenario 4: Coupon. You want to create a promotion for a free cookie with the purchase of a sandwich and the presentation of a coupon. The promotion will only be good for the month of April. Additionally, you want to cap the maximum discount amount at $2.50. Prior to creating the promotion, you create two tags, one for sandwiches and one for cookies. You also create an event for the promotion.
The system process the promotion as follows: The customer presents the coupon at the time of payment. The employee scans the coupon and the system confirms the guest check contains the necessary items for the promotion to apply. If it does, the system applies the discount to the cookie up to $2.50.
- In Silver Back Office, select MENU > PROMOTIONS.
- Click Add a Promotion.
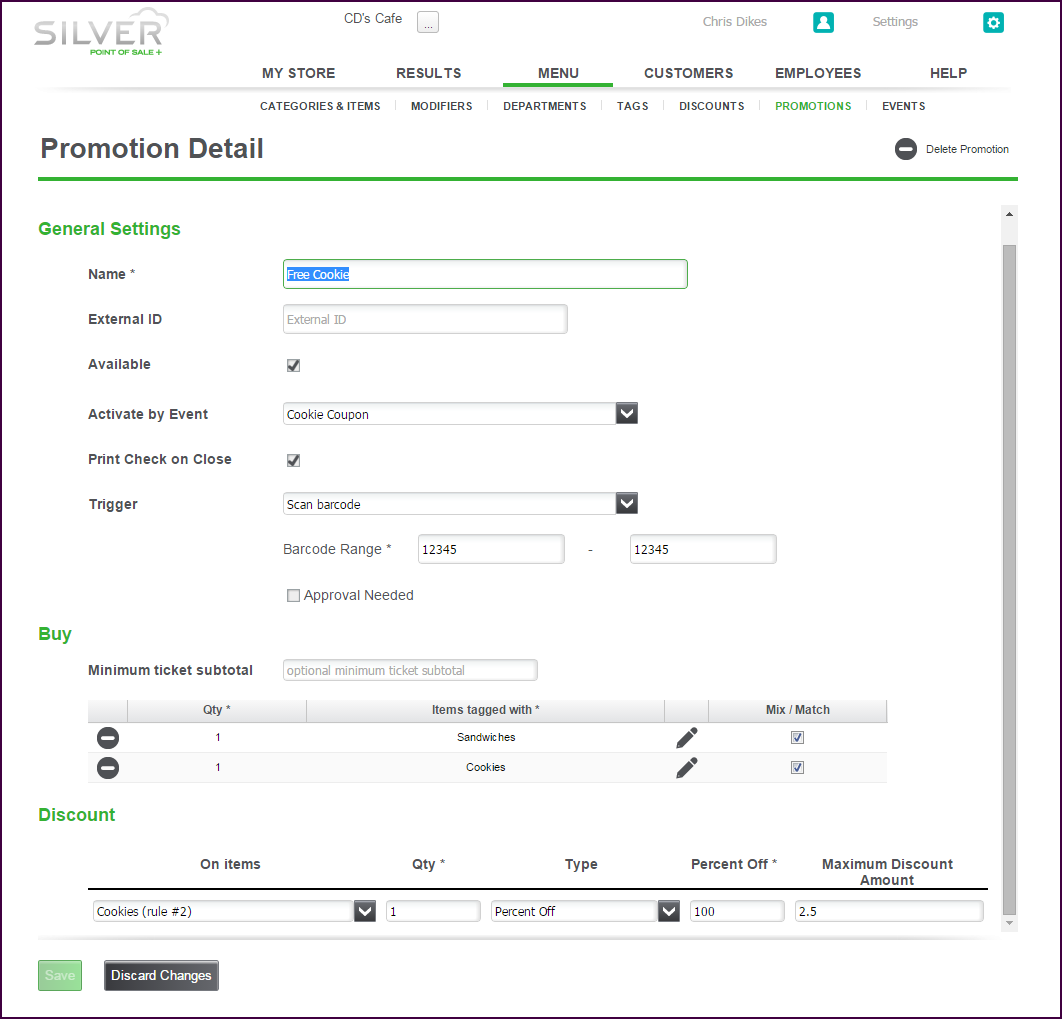
- Type a name for the promotion, such as ‘Free Cookie.’’
- (Multi-Sites only) At the company level, click Assign to assign the promotion to stores.
- Select the event from the drop-down list.
- Select Print check on close to print a duplicate receipt when you close the check.
- Select Scan barcode as the event trigger.
- Type the starting and ending barcode range.
- Under ‘Buy,’ for the first rule of the promotion, select the Sandwich tag.
- Click to create a second rule for the promotion and select the Cookies tag.
- Under ‘Discount,’ select Cookies (rule #2) for on items, as you only want to discount the second burger.
- Select ‘1’ for the quantity.
- Select Percent Off from the Type drop-down list.
- Type 100 for the percent off.
- Type 2.50 for the maximum discount amount.
- Click Save.
Scenario 5: Amount Off. You want to create a promotion for $3.00 off one hamburger when a customer purchases two hamburgers. You want the promotion to require the presentation of a coupon and have a manager authorize the discount. Additionally, the promotion is only to apply for the month of April. Prior to creating the promotion, you create one burger tag and an event for the promotion.
The system processes the promotion as follows: The customer presents the coupon at the time of payment. The employee scans the coupon and the system confirms the items are from the Burger tag. If the guest check meets the promotion requirements, the system prompts the employee for manager authorization to apply the discount.
- In Silver Back Office, select MENU > PROMOTIONS.
- Click Add a Promotion.
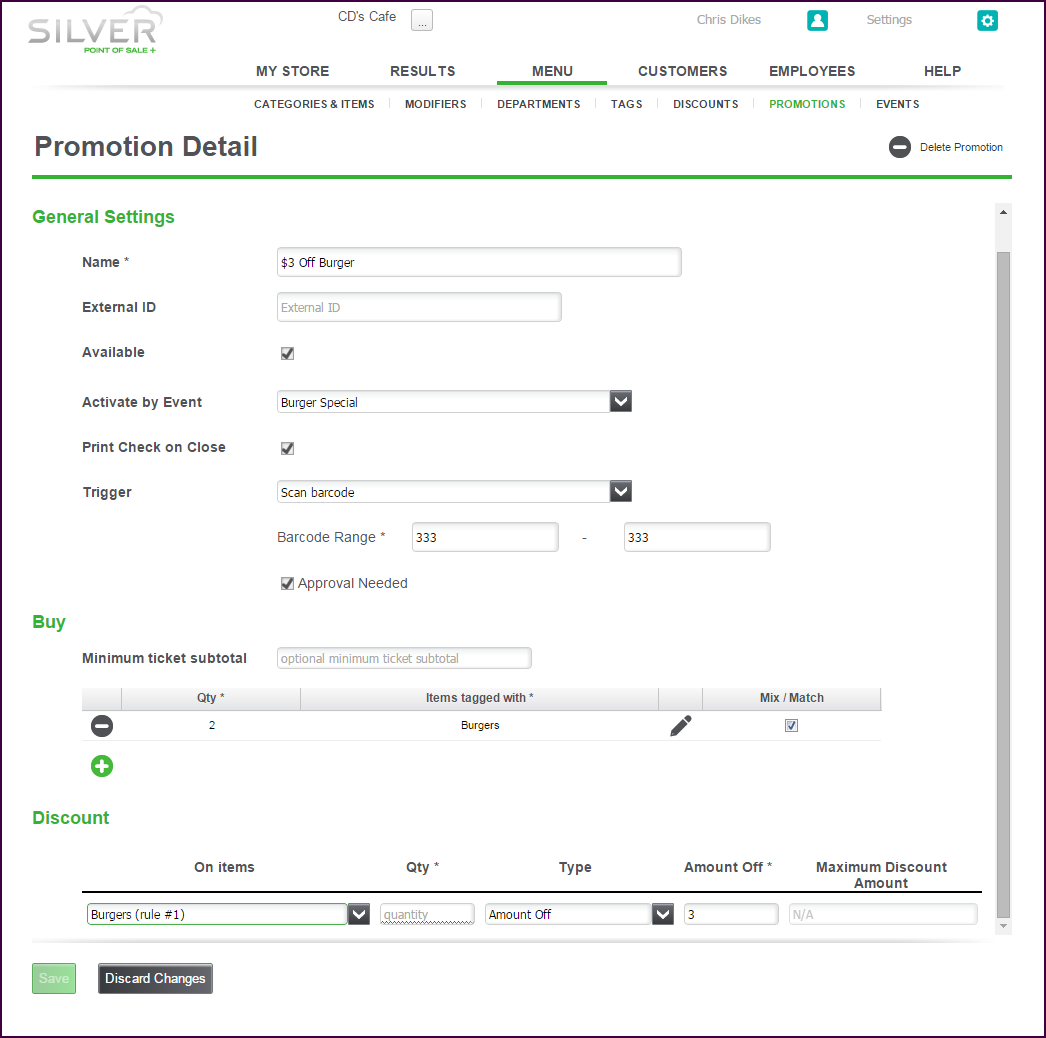
- Type a name for the promotion, such as ’$3 Off Burger.’
- Select Available to enable the promotion.
- Select the event for the promotion, such as ‘Burger Special.’
- Select Print check on close.
- Select Scan barcode as the trigger.
- Type the starting and ending barcode range.
- Select Approval needed.
- Under ‘Buy,’ for the first rule of the promotion, type 2 for the quantity and select the Burgers tag from the drop-down list.
- Under ‘Discount,’ select Burgers (rule#1) for On items.
- Type 1 for the quantity.
- Select Amount off from the Type drop-down list.
- Type ‘3.00’ for the amount off.
- Click Save.
See also:
About Promotions
Configuring Promotions
Using Promotions